
A screwdriver that keeps spinning in a damaged screw head can turn a five-minute car repair into an afternoon of frustration. Maybe you’re replacing a license plate, removing an interior trim panel, or trying to loosen a rusted bracket. Your next move matters because forcing the same screwdriver into the head can leave you with even less to grip.
The safest way to remove a stripped screw is to identify what has failed and choose the least destructive removal method that has a realistic chance of working. Some screws release with a better-fitting bit. Others need locking pliers, a specialized extractor, or professional attention.
This complete guide explains how to remove a stripped screw, identify damaged or seized screws, select the proper tools, and deal with common automotive repair situations. You’ll learn what works, why it works, when to stop, and how to prevent the same problem.
Quick Answer
How to Remove a Stripped Screw Without Making It Worse
Start by cleaning the screw head and selecting the correct screwdriver type and size. Push the screwdriver firmly into the recess, maintain straight alignment, and turn slowly counterclockwise for a standard right-hand screw.
If the screwdriver slips, stop before damaging the head further. Then select a method based on the screw’s condition:
- Slightly stripped: Use a fresh, properly fitting screwdriver bit.
- Minor damage: Try a wide rubber band for additional grip.
- Exposed screw head: Grip the head with screw-extraction or locking pliers.
- Stubborn screw in sturdy metal: Consider a manual impact screwdriver if the bit still engages.
- Severely damaged head: Consider a suitable screw extractor.
- Completely stuck screw: Evaluate more advanced removal or professional help.
Important: A seized screw or one with stripped threads needs a different approach from a screw with a damaged head.
What Is a Stripped Screw?
A stripped screw usually has a damaged drive recess: the Phillips cross, Torx star, hex socket, or slot where the screwdriver fits. When that recess becomes worn or rounded, the screwdriver no longer grips properly and may slip instead of turning the fastener.
However, people sometimes use the term “stripped screw” for several different problems. Knowing the difference helps you select a repair method.
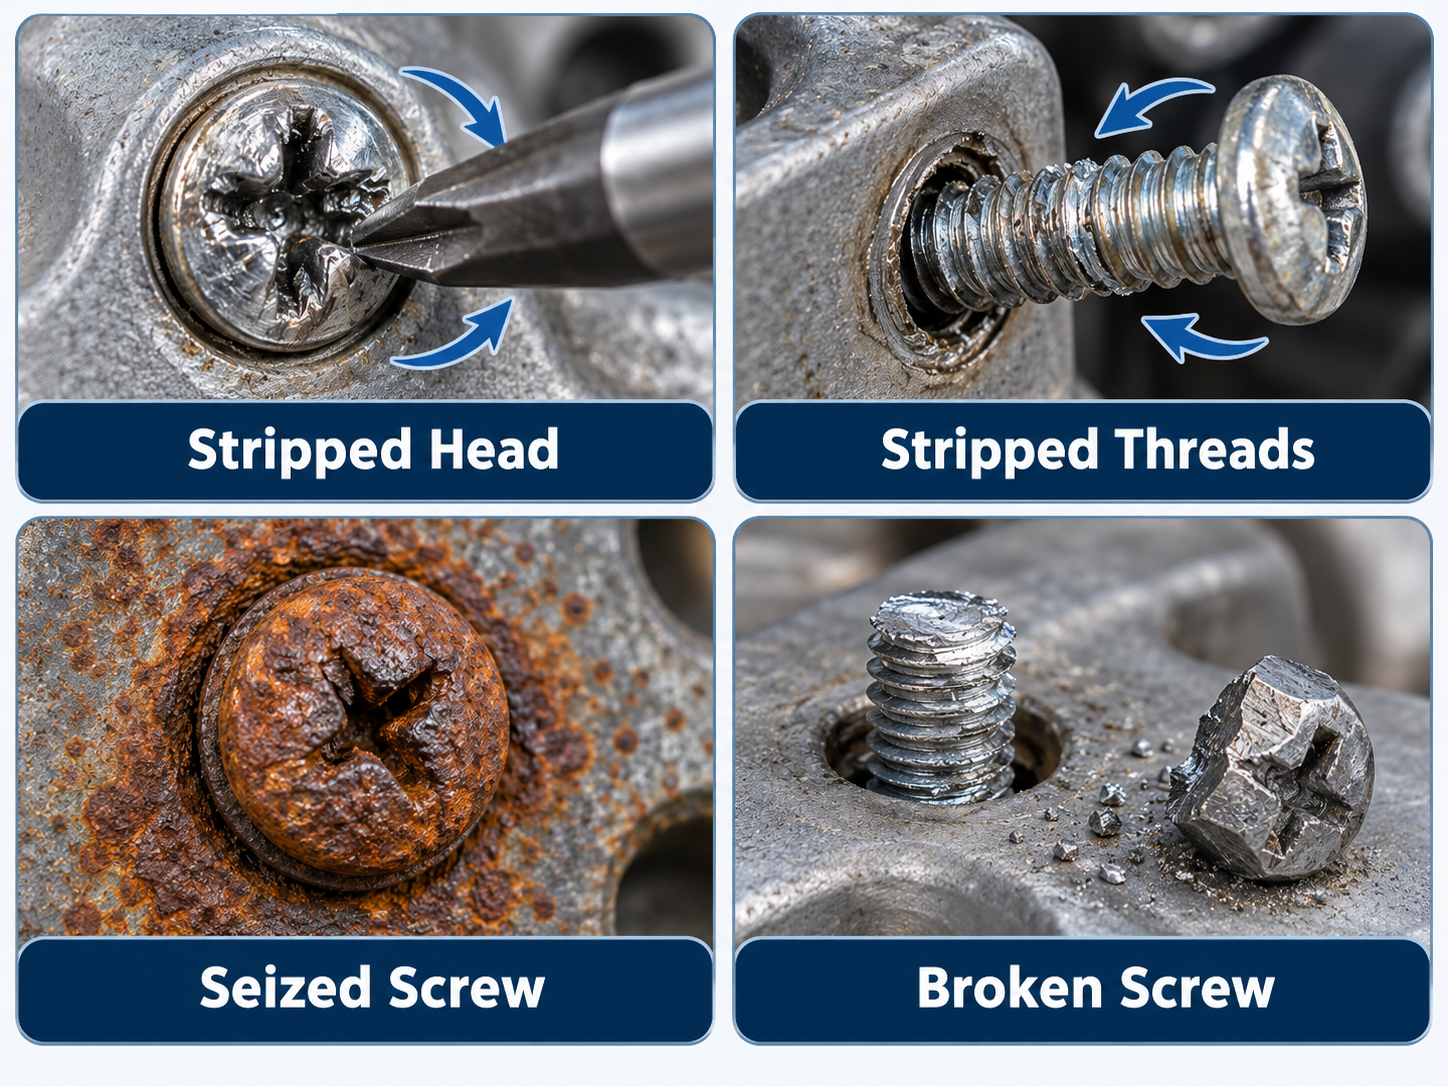
| Problem | What Happens? | Possible Solution |
|---|---|---|
| Stripped head | Screwdriver slips inside the recess. | Improve grip or use an extractor. |
| Stripped threads | Screw rotates but does not back out. | Inspect threads and mounting insert. |
| Seized screw | Fastener will not rotate. | Address corrosion or binding. |
| Broken screw | Head or shaft breaks apart. | Specialized extraction may be required. |
Why Do Screws Become Stripped?
Common causes include using an incorrectly sized screwdriver, applying too much torque, holding the driver at an angle, or repeatedly using a damaged screw.
Rust and corrosion can also make a screw difficult to turn. Applying excessive force to a seized screw may damage the head before the threads release.
Automotive screws are especially vulnerable when exposed to road salt, moisture, dirt, and repeated installation or removal.
Find the Right Screw Removal Method
Not sure where to start? Open the situation that best matches your problem to identify the next practical step.
My screwdriver keeps slipping
Clean the recess, check your screwdriver size and drive type, and try a fresh bit. If the screw is only slightly damaged, the rubber band method may help. Stop if the screw head becomes rounder.
The screw head is completely rounded
If the head protrudes above the surface, screw-extraction pliers may grip its exterior. If it is recessed, a properly matched screw extractor may be more suitable.
The screw is rusted and will not move
Treat it as a potentially seized fastener. Clean loose corrosion, inspect the mounting material, and use a suitable penetrating oil where safe. Allow the recommended dwell time before attempting controlled removal.
The screw spins but does not come out
The mounting threads or insert may be stripped. More screwdriver grip will not solve this. Carefully inspect the mounting point and determine whether gentle outward pressure can help without damaging the component.
The screw is inside a plastic car panel
Use a hand screwdriver first and support the panel. Avoid hammering, cutting, or drilling near fragile trim or hidden wiring. If the plastic mount is damaged, the repair may require replacing the insert or mounting component.
Tools You May Need to Remove a Stripped Screw
You do not need to buy every tool before starting. Choose your equipment based on the screw’s condition, accessibility, and surrounding material.
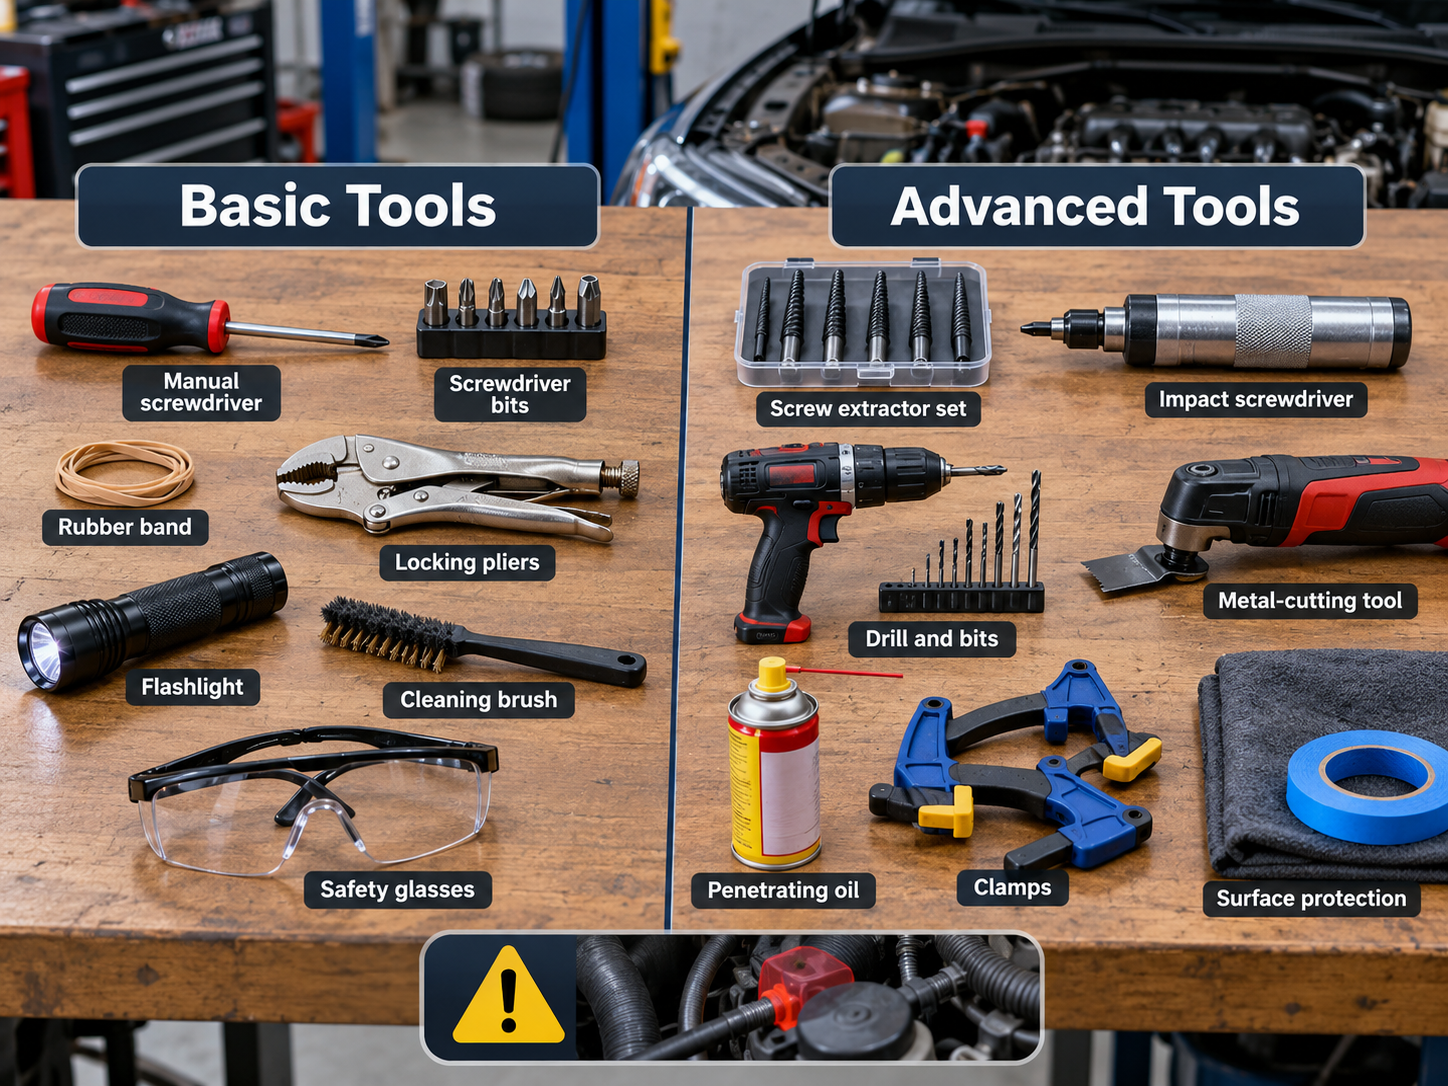
Basic Tools
- Manual screwdriver
- Different screwdriver bits
- Wide rubber band
- Locking pliers
- Flashlight
- Small cleaning brush
- Safety glasses
Advanced Tools
- Screw extractor set
- Manual impact screwdriver
- Suitable drill and bits
- Metal-cutting tool
- Penetrating oil
- Clamps or work support
- Surface protection materials
Before starting an automotive repair, inspect the area for electrical components, fuel lines, sensors, hoses, airbags, and other parts that could be damaged during removal.
Before You Start: Prepare the Screw and Work Area
Preparation matters because a damaged screw can become significantly harder to remove after repeated unsuccessful attempts.
- Inspect the screw head. Determine whether the drive recess, threads, or both are damaged.
- Clean loose debris. Remove accumulated dirt, grease, loose rust, and paint that prevent proper tool engagement.
- Identify the screw type. Phillips, Pozidriv, Torx, hex, and other drive styles require compatible tools.
- Check the thread direction. Most everyday screws have right-hand threads, but exceptions exist.
- Support the component. Secure loose brackets or panels so they do not flex during removal.
- Protect nearby surfaces. Use an appropriate shield to reduce scratches and accidental contact.
- Inspect behind the fastener. Know what lies behind the screw before using penetrating tools.
How to Remove a Stripped Screw: 7 Practical Methods
There is no universal method for every damaged screw. Start with the least destructive option that matches the problem, and move to more advanced techniques only when necessary.
Method 01 · Beginner
Use the Correct Screwdriver and Apply Firm Pressure
Best for: Screws with a slightly damaged recess that can still grip a screwdriver.
Before trying complicated tricks, verify that the screwdriver actually fits the screw. A worn or incorrect bit is often the reason a fastener becomes stripped in the first place.
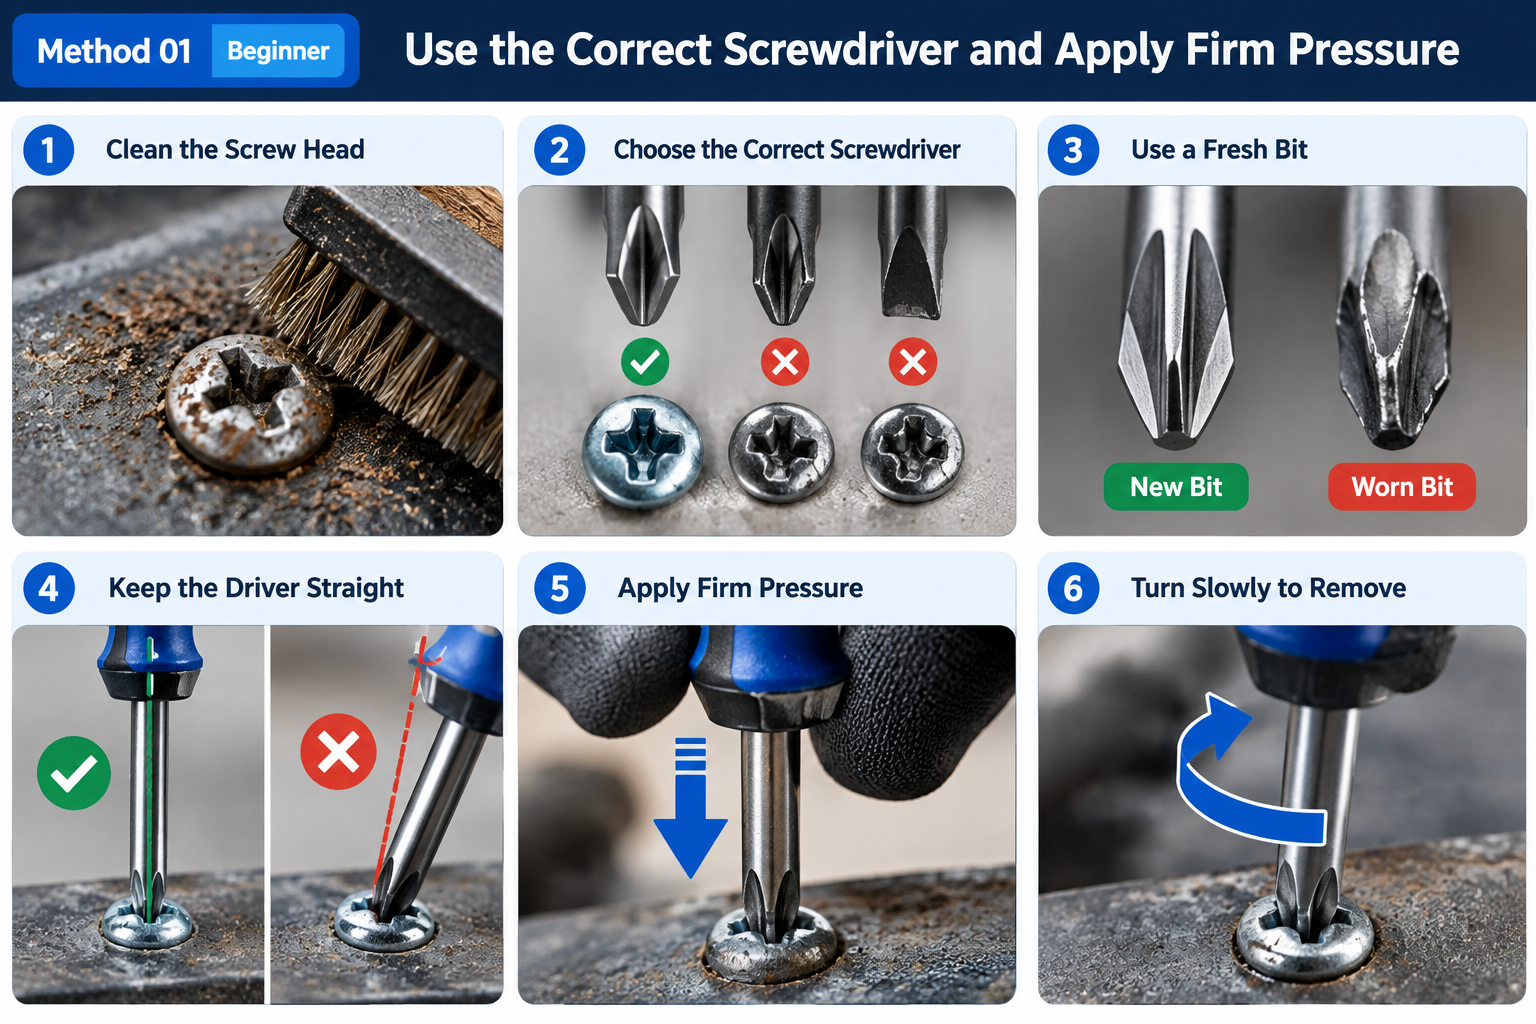
Step-by-Step Instructions
- Clean dirt or debris from the screw head.
- Identify the exact drive style and choose a matching screwdriver.
- Use a fresh bit that fits snugly without wobbling.
- Hold the screwdriver straight, directly in line with the screw.
- Apply steady inward pressure while turning slowly.
- Stop immediately if the bit continues slipping.
Why it works: A well-fitting driver transfers more turning force to the screw instead of damaging the recess.
When it will not work: If the recess is completely rounded, changing the screwdriver size may not restore enough grip.
Method 02 · Simple DIY
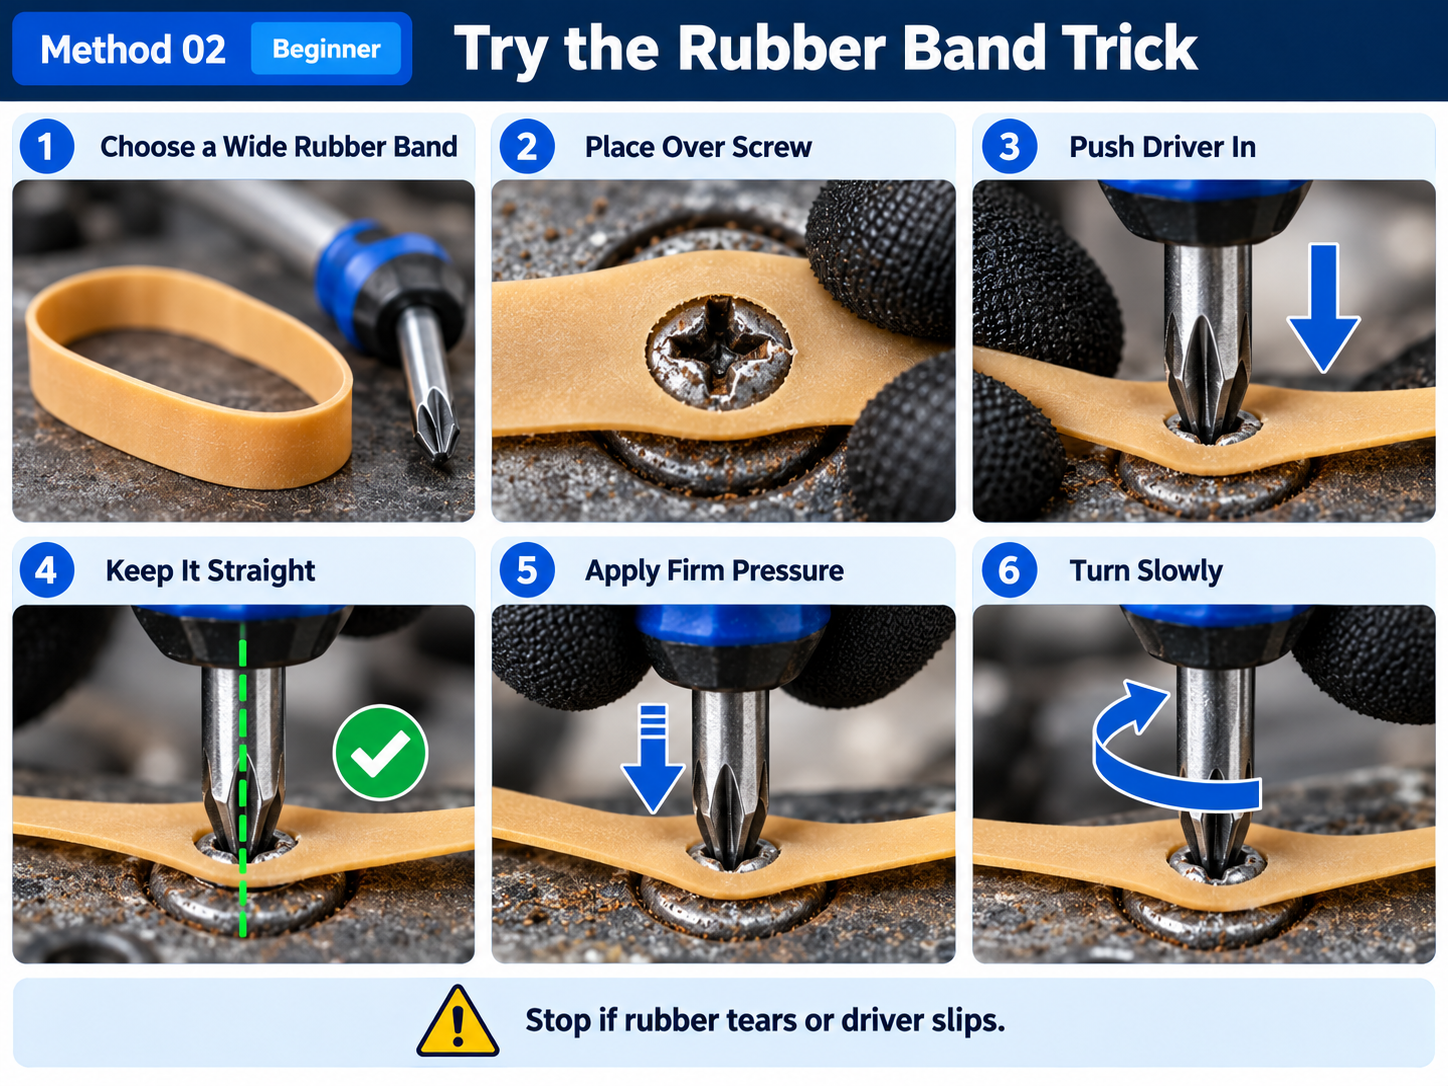
Try the Rubber Band Trick
Best for: Lightly rounded screw heads with relatively low resistance.
The rubber band trick is popular because it requires very little equipment. A wide piece of rubber can fill small spaces between a screwdriver tip and a worn screw recess.
How to Do It
- Choose a wide, relatively thick rubber band.
- Place the rubber band directly over the damaged screw head.
- Push the correctly sized screwdriver through the rubber into the recess.
- Maintain firm, straight pressure.
- Turn slowly in the loosening direction.
- Stop if the rubber tears or the screwdriver slips repeatedly.
Why it works: The rubber may add friction and help the driver engage a mildly damaged recess.
Method 03 · Exposed Screw Heads
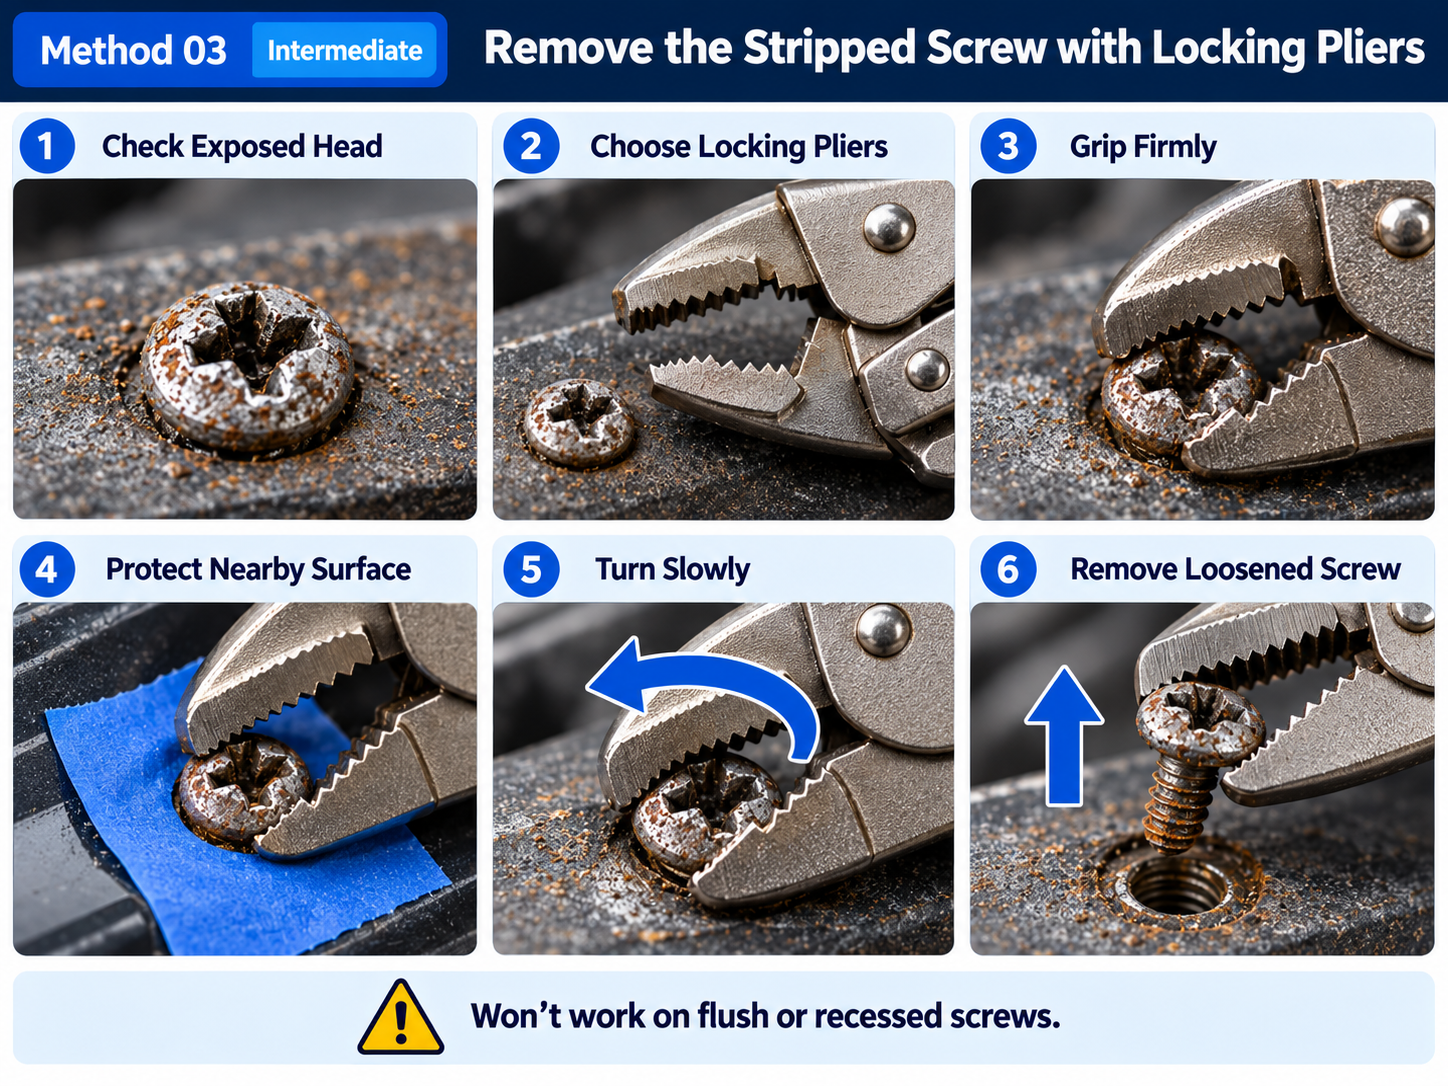
Remove the Stripped Screw with Locking Pliers
Best for: Screws with an exposed head or enough protruding shaft to grip securely.
When the screwdriver recess is too damaged to use, gripping the outside of the screw can bypass the problem entirely.
Instructions
- Inspect whether enough screw head is visible above the surface.
- Choose screw-extraction or locking pliers with suitable jaws.
- Adjust the jaws to grip the screw firmly.
- Protect nearby paint or plastic from accidental contact.
- Turn slowly with controlled pressure.
- Once loosened, remove the screw with the appropriate hand tool.
Why it works: The pliers grip the exterior of the screw, so the damaged screwdriver recess no longer matters.
Limitation: This technique usually will not work on fully recessed or flush screw heads that provide no side access.
Method 04 · Intermediate
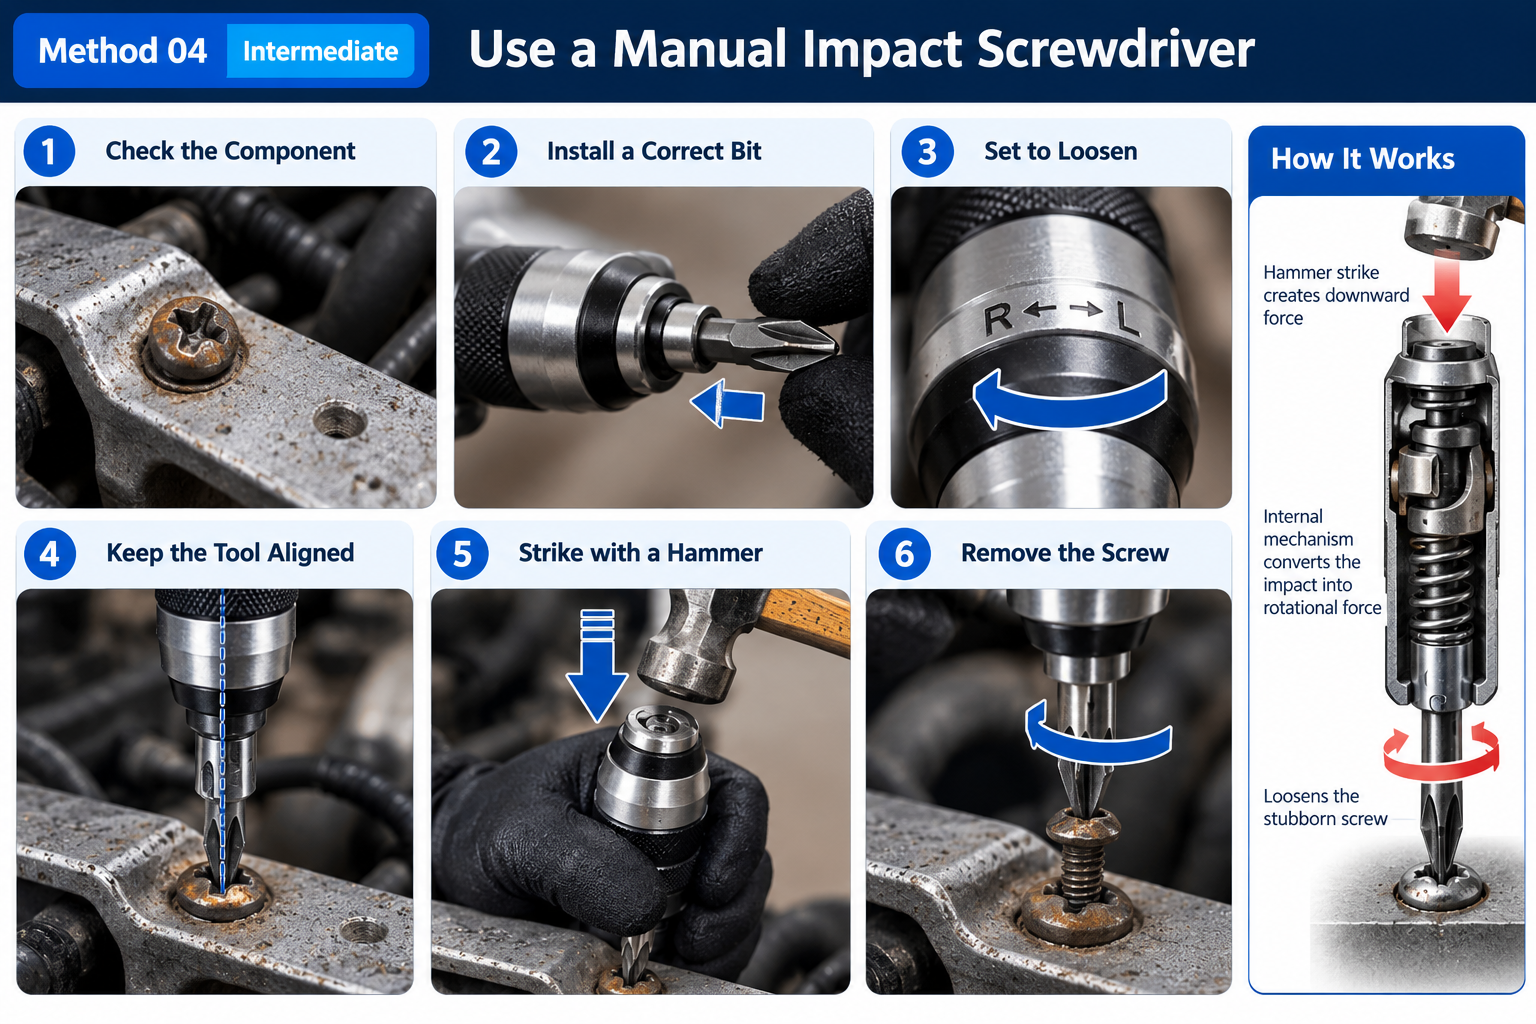
Use a Manual Impact Screwdriver
Best for: Stubborn screws installed in sturdy, well-supported metal components when the driver still engages the head.
A manual impact screwdriver converts a controlled hammer strike into a brief turning action. This can help loosen certain stubborn fasteners.
Instructions
- Confirm that the component can withstand impact without damage.
- Install a correctly fitting impact-rated screwdriver bit.
- Set the tool to the loosening direction.
- Keep the tool aligned with the screw head.
- Follow the tool manufacturer’s instructions for controlled impact.
- Switch to a hand screwdriver when the fastener loosens.
Why it works: The tool combines downward force with rotational force to help break the fastener loose.
Important: Do not use this technique on delicate plastic trim, unsupported brackets, sensitive electrical components, or screw heads with no remaining bit engagement.
Method 05 · Advanced
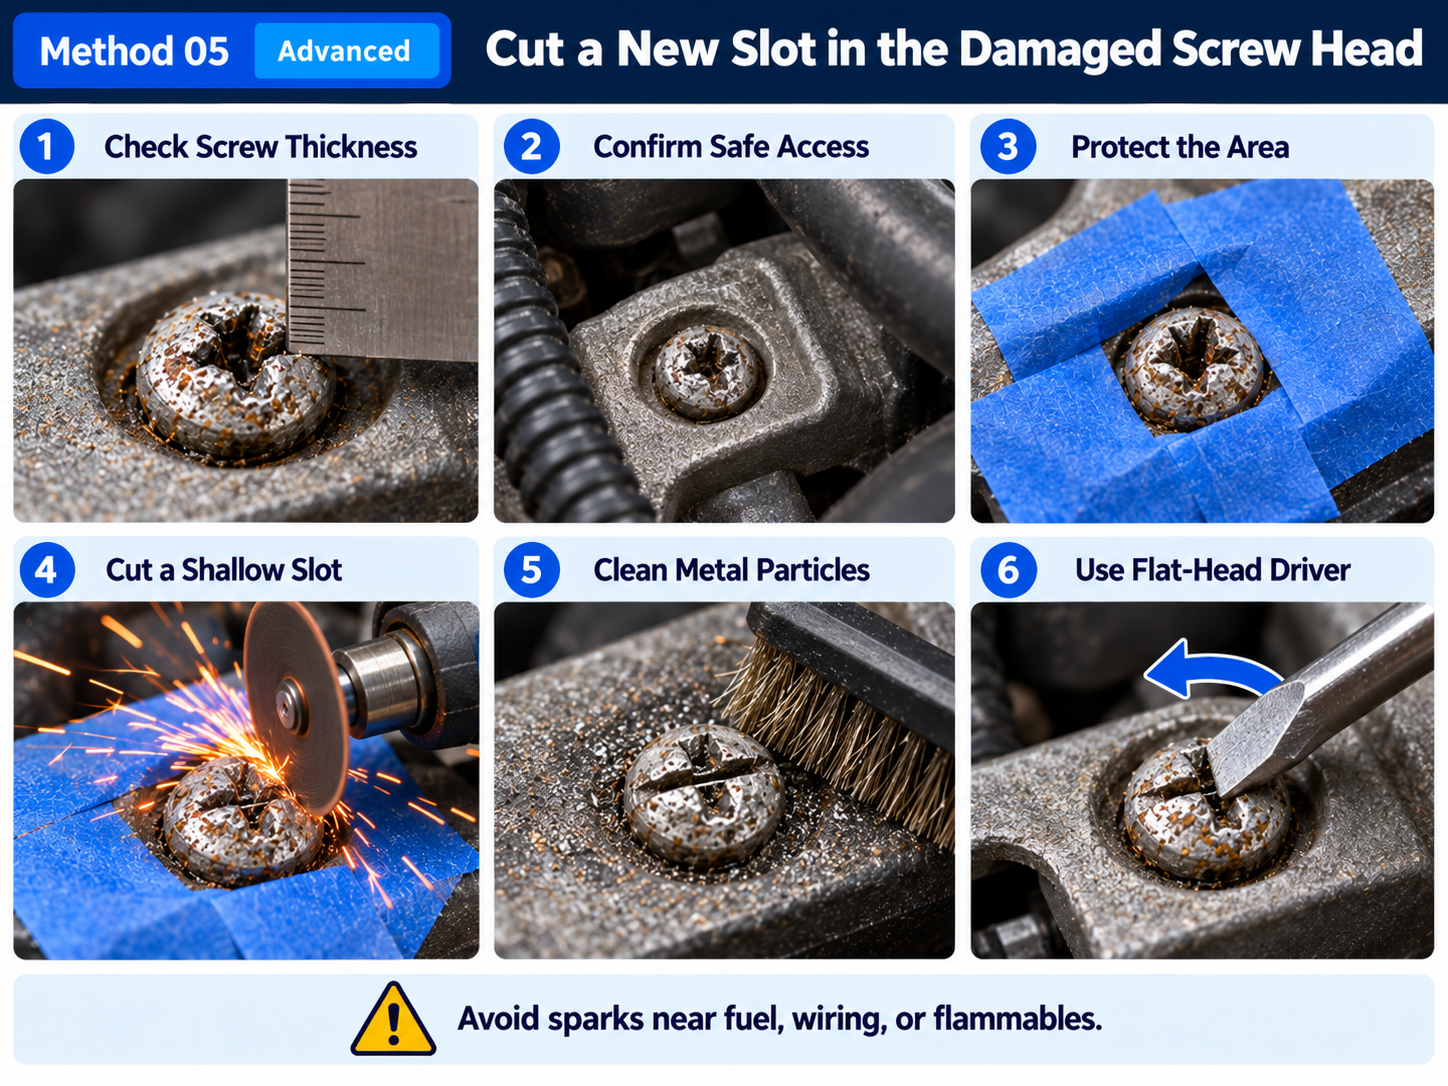
Cut a New Slot in the Damaged Screw Head
Best for: Accessible metal screw heads with enough remaining material to form a new slot.
If the original recess is completely damaged, creating a new straight slot can sometimes allow removal with a flat-head screwdriver.
Instructions
- Check whether the screw head has sufficient thickness.
- Ensure the cutting tool can reach the head without contacting nearby materials.
- Secure the component and protect the surrounding area.
- Following the tool’s safety instructions, carefully create a shallow straight slot.
- Clean away metal particles.
- Insert a properly fitting flat-head screwdriver and turn slowly.
Why it works: The newly cut slot creates a fresh contact surface for the screwdriver.
Safety: Cutting tools may produce sparks and metal fragments. Do not attempt this near fuel systems, flammable materials, wiring, or any component where full clearance cannot be maintained.
Method 06 · Specialized Extraction
Use a Screw Extractor Set
Best for: Severely stripped screw heads when simpler methods are ineffective.
A screw extractor is a specialized tool designed to grip damaged fasteners. Different extractor designs work differently. Some engage the head directly, while others require a pilot hole.
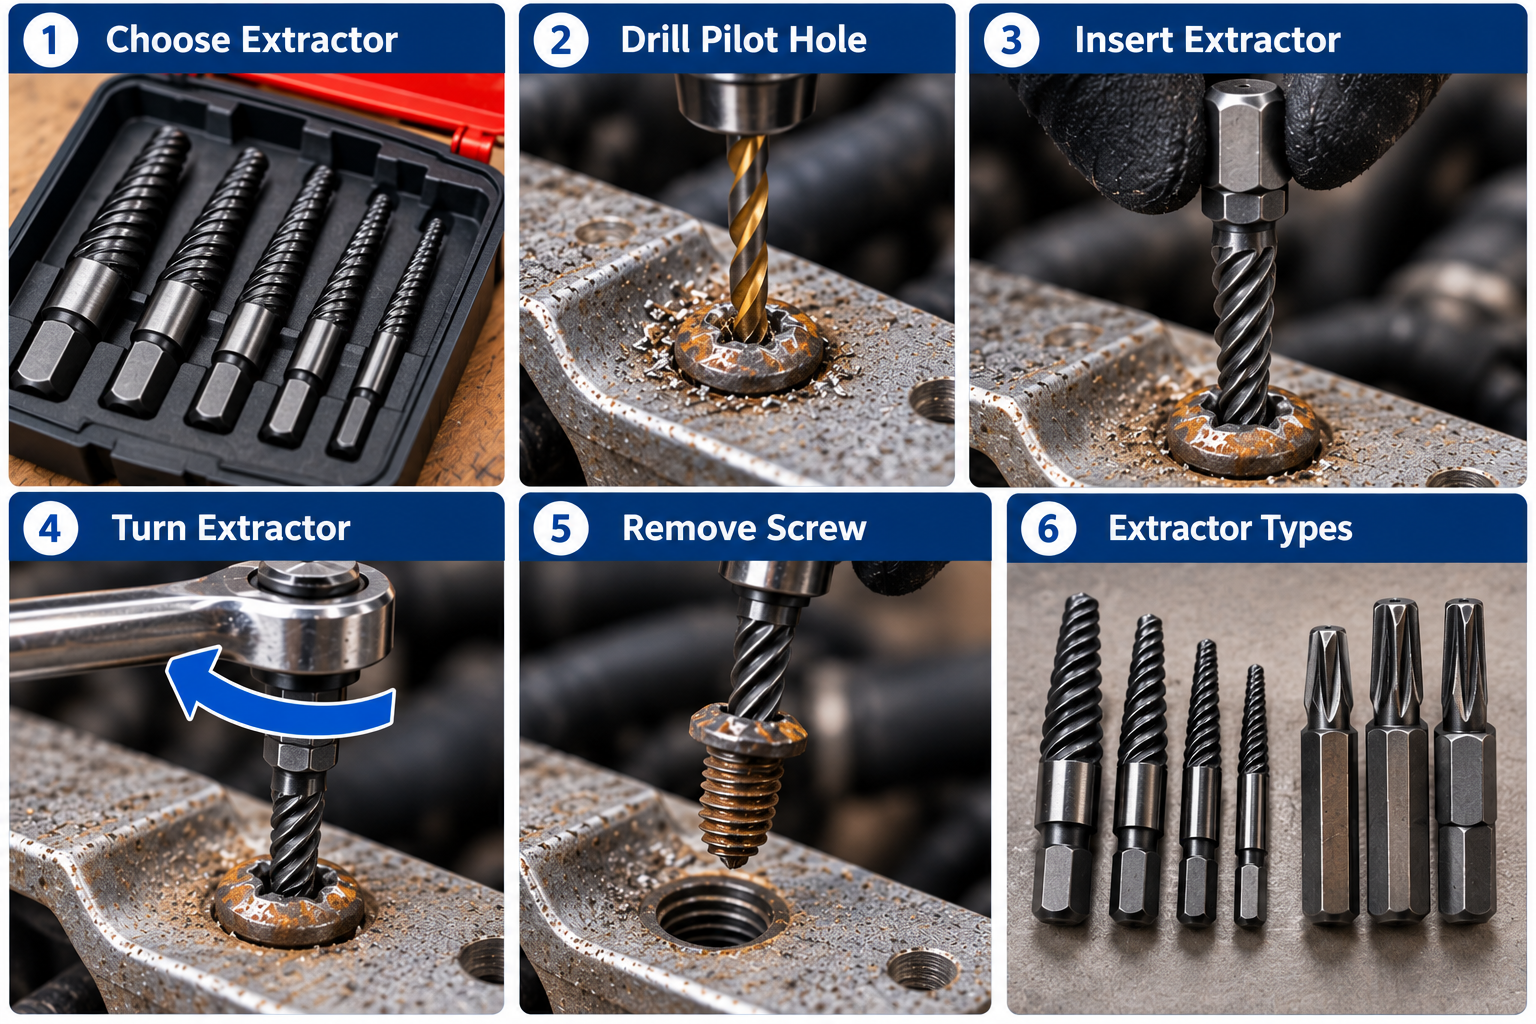
Instructions
- Select an extractor compatible with the screw diameter and material.
- Read the extractor manufacturer’s instructions.
- Secure the component and inspect the available clearance.
- If the extractor requires drilling, follow its specified pilot-hole dimensions and depth.
- Engage the extractor according to its design.
- Apply slow, controlled turning force in the specified direction.
- Stop if the extractor begins to flex, bind, or chip.
Why it works: The extractor establishes a new gripping point where the original screwdriver recess has failed.
Method 07 · Last Resort
Drill Out the Stripped Screw
Best for: Suitable metal fasteners in safely accessible assemblies where other methods have failed.
Drilling is usually a more destructive option. It may allow the head to be removed so the component can be separated, but it can also damage the original mounting threads.
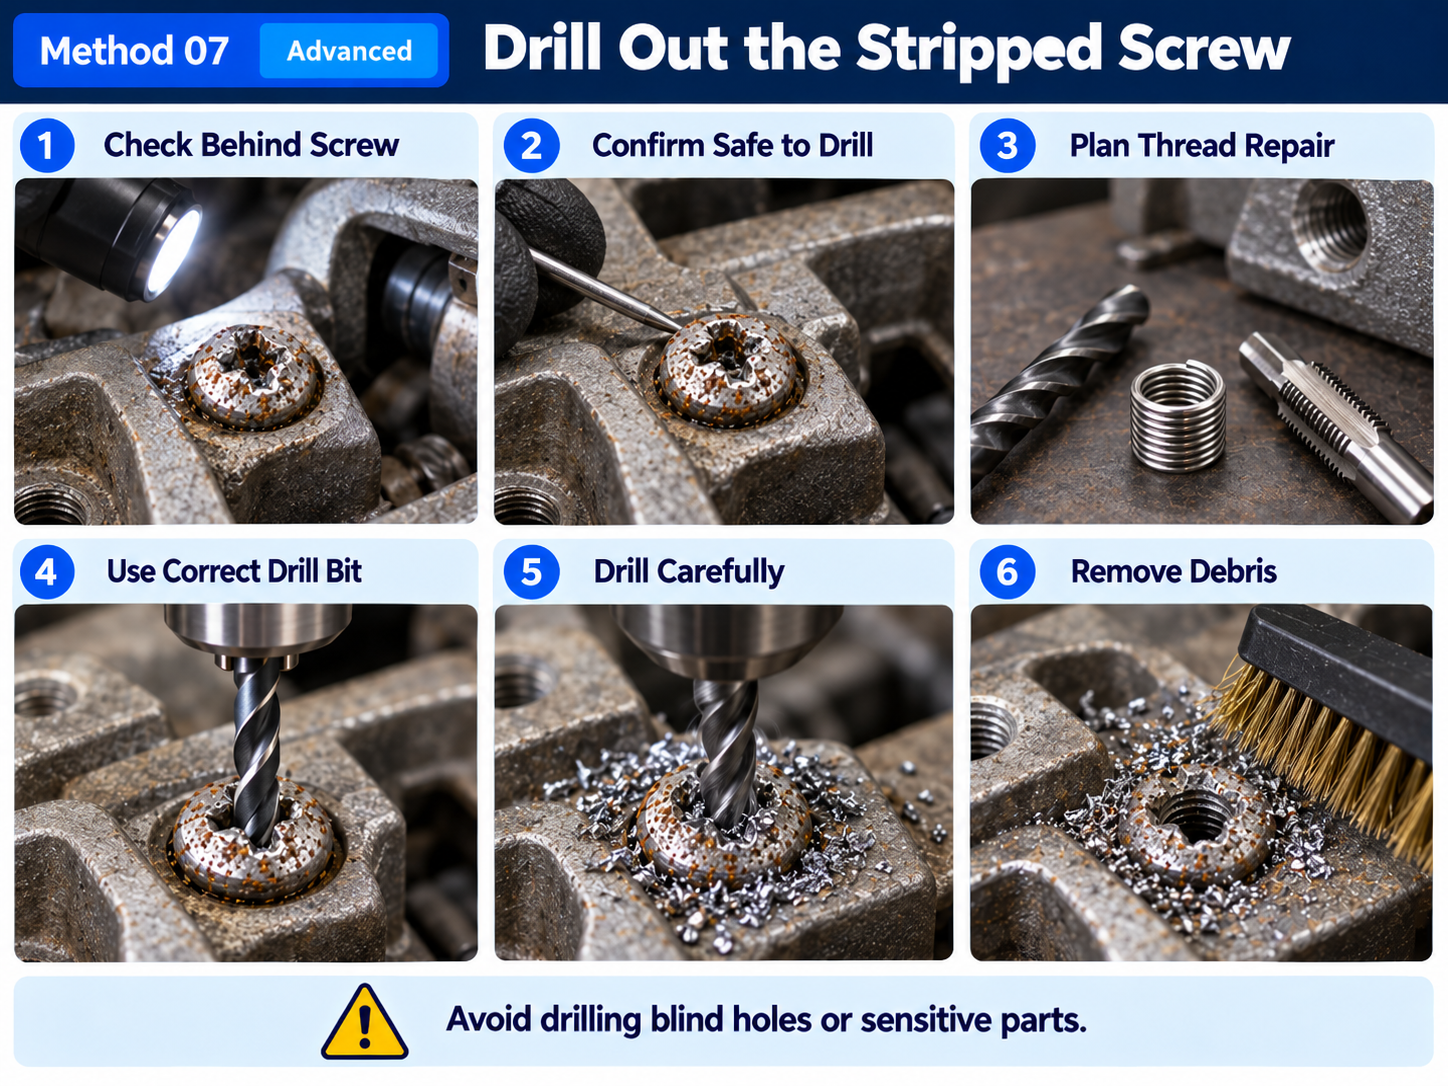
Before Attempting Removal
- Determine what is behind and around the screw.
- Confirm that drilling is appropriate for the fastener and mounting material.
- Identify how remaining screw material will be removed.
- Plan for possible thread repair or replacement hardware.
- Use the correct equipment and component-specific procedure.
- Collect all metal fragments before reassembly.
Why it works: Removing enough material may release the screw head or allow access to the remaining shaft.
When to seek help: Avoid drilling when clearance is uncertain, the fastener is in a blind threaded hole, or the surrounding assembly is expensive, sensitive, or safety-critical.
How to Remove Seized Screws and Rusted Fasteners
A seized screw is different from a stripped screw. Its head may still be in good condition, but the fastener refuses to turn because of corrosion, contamination, thread-locking compound, or mechanical binding.
Applying excessive torque can snap the shaft or damage the drive recess, creating two problems instead of one.
A Safer Removal Approach
- Inspect the fastener: Look for visible rust, deformation, and damaged surrounding material.
- Remove loose corrosion: Clean accessible rust and dirt with a suitable brush.
- Apply penetrating oil: Use a product compatible with the material and surrounding finish.
- Allow time to penetrate: Follow the product’s instructions rather than immediately applying more force.
- Use a correctly fitting tool: Fully engage the screw head before attempting removal.
- Apply controlled pressure: Avoid sudden jerking or excessive force.
- Stop if resistance remains excessive: Reassess the condition before considering another technique.
For certain well-supported metal assemblies, a manual impact screwdriver may help, provided the fastener still has a usable drive recess and the surrounding component can safely tolerate the impact.
What If the Screw Spins but Will Not Come Out?
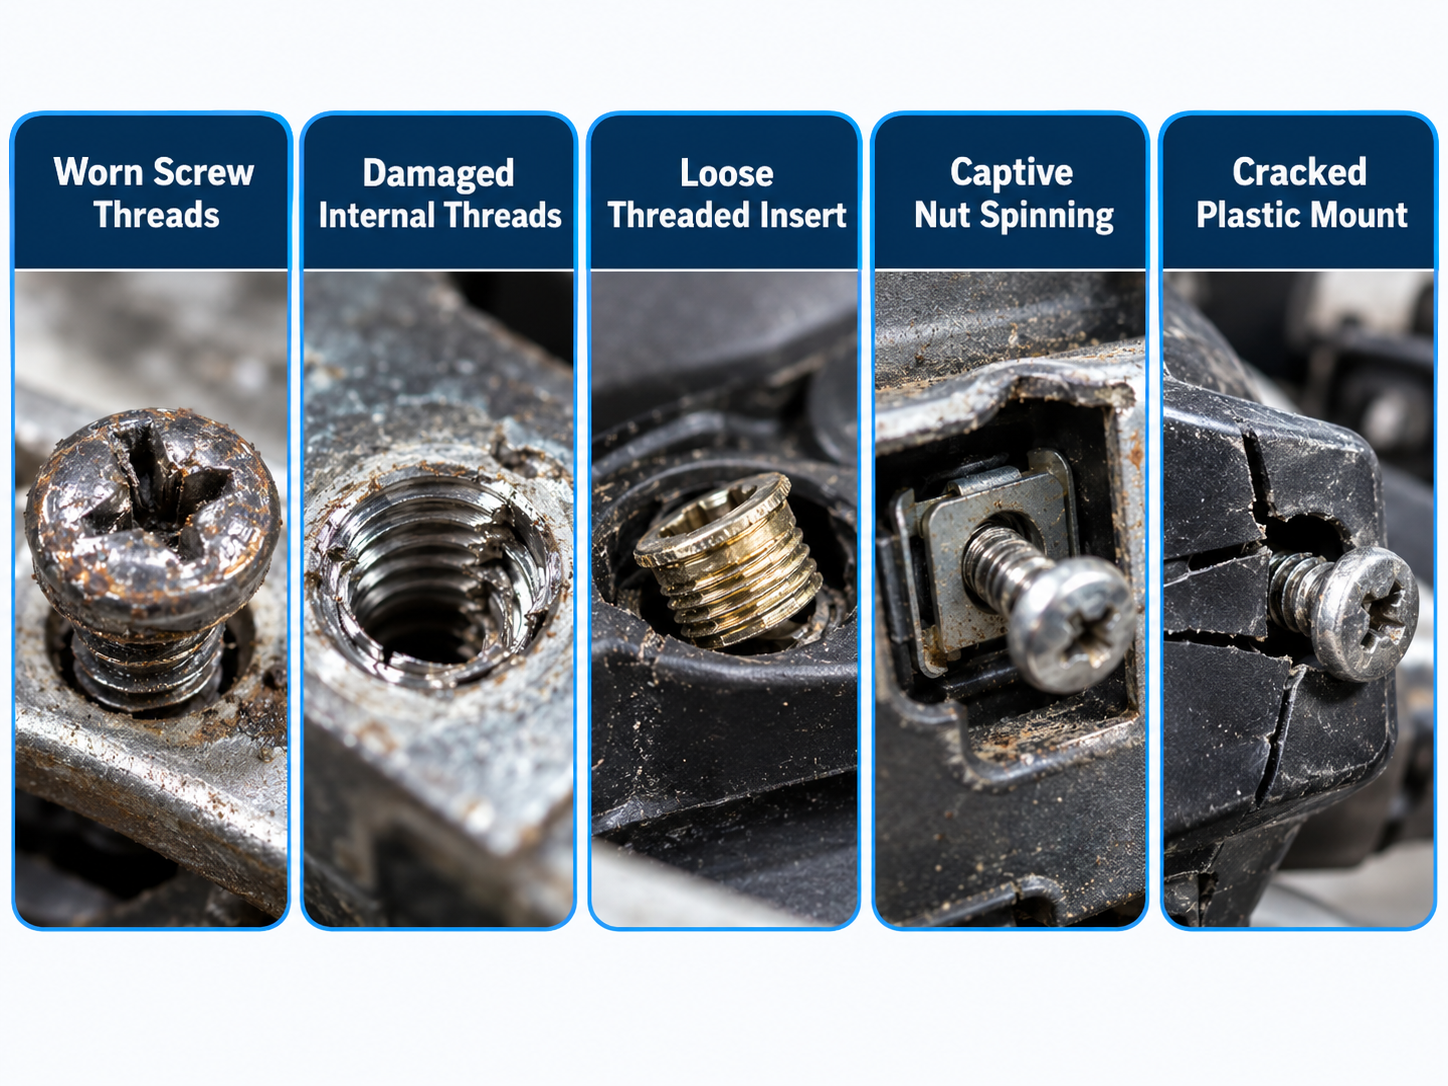
If the screwdriver grips properly and the screw rotates but does not move outward, you may be dealing with stripped threads rather than a stripped head.
This can happen when:
- The threads on the screw have worn away.
- The internal threads of the mounting hole are damaged.
- A threaded insert has become loose.
- A captive nut is spinning behind the component.
- A plastic mounting boss has cracked.
What Should You Do?
First, inspect whether the screw head lifts slightly when turned. If the mounting design permits it and you can protect the component, gentle outward tension may help the remaining threads engage while loosening.
However, aggressive prying can tear out plastic inserts or damage mounting holes. If an internal insert is rotating, the component may need to be accessed from behind or partially disassembled.
Remember: A rubber band or screw extractor cannot repair damaged mounting threads. After removal, inspect the hole and determine whether the mounting point requires repair.
How to Remove Stripped Screws from Car Parts
Automotive repairs require extra care because screws are frequently installed near painted surfaces, plastic trim, electrical wiring, and delicate mechanical components.
License Plate Screws
License plate screws may become corroded because of rain, road salt, and moisture. Inspect the plate bracket and mounting insert before removal. Exposed screws may be suitable for pliers, but protect surrounding paint and avoid damaging the bracket.
Dashboard and Interior Trim
Interior screws may be installed in plastic mounting points. Excessive torque can crack the plastic or loosen embedded inserts. Use properly fitting hand tools and avoid impact, drilling, or cutting near hidden wiring and airbags.
Engine Bay Brackets
Metal brackets can contain rusted or seized screws. Before attempting removal, inspect nearby hoses, wires, fuel-system components, and sensors. More aggressive methods require safe clearance and appropriate support.
Stripped Screw Removal Methods Compared
The following table helps you choose a technique according to screw damage and available access.
| Method | Best For | Experience | Main Limitation |
|---|---|---|---|
| Correct screwdriver | Minor wear | Beginner | Needs remaining recess grip |
| Rubber band | Slightly rounded head | Beginner | Limited additional grip |
| Locking pliers | Exposed screw head | Beginner–intermediate | Requires outside access |
| Impact screwdriver | Stubborn metal fasteners | Intermediate | Not for fragile components |
| Cut a slot | Accessible damaged head | Advanced | Cutting hazards |
| Screw extractor | Severely stripped head | Intermediate | Extractor breakage |
| Drilling | Last-resort extraction | Advanced | Possible thread damage |
Troubleshooting: Why Is the Stripped Screw Still Stuck?
Sometimes the first removal method doesn’t work. Instead of repeating the same attempt, use these symptoms to decide what needs to change.
| What Happens? | Possible Cause | Next Step |
|---|---|---|
| Rubber band keeps slipping | Severe head damage | Try another suitable gripping method |
| Pliers slip around the head | Insufficient exposed surface | Reassess access and tool choice |
| Screw does not rotate | Corrosion or binding | Address seizure before increasing force |
| Extractor starts bending | Incorrect sizing or excessive resistance | Stop before the extractor breaks |
| Screw turns but stays inside | Stripped mounting threads | Inspect the insert and thread engagement |
When Should You Stop and Call a Professional?
Removing a damaged screw yourself is not always the most economical option. A mistake near an expensive automotive component can cost considerably more than professional extraction.
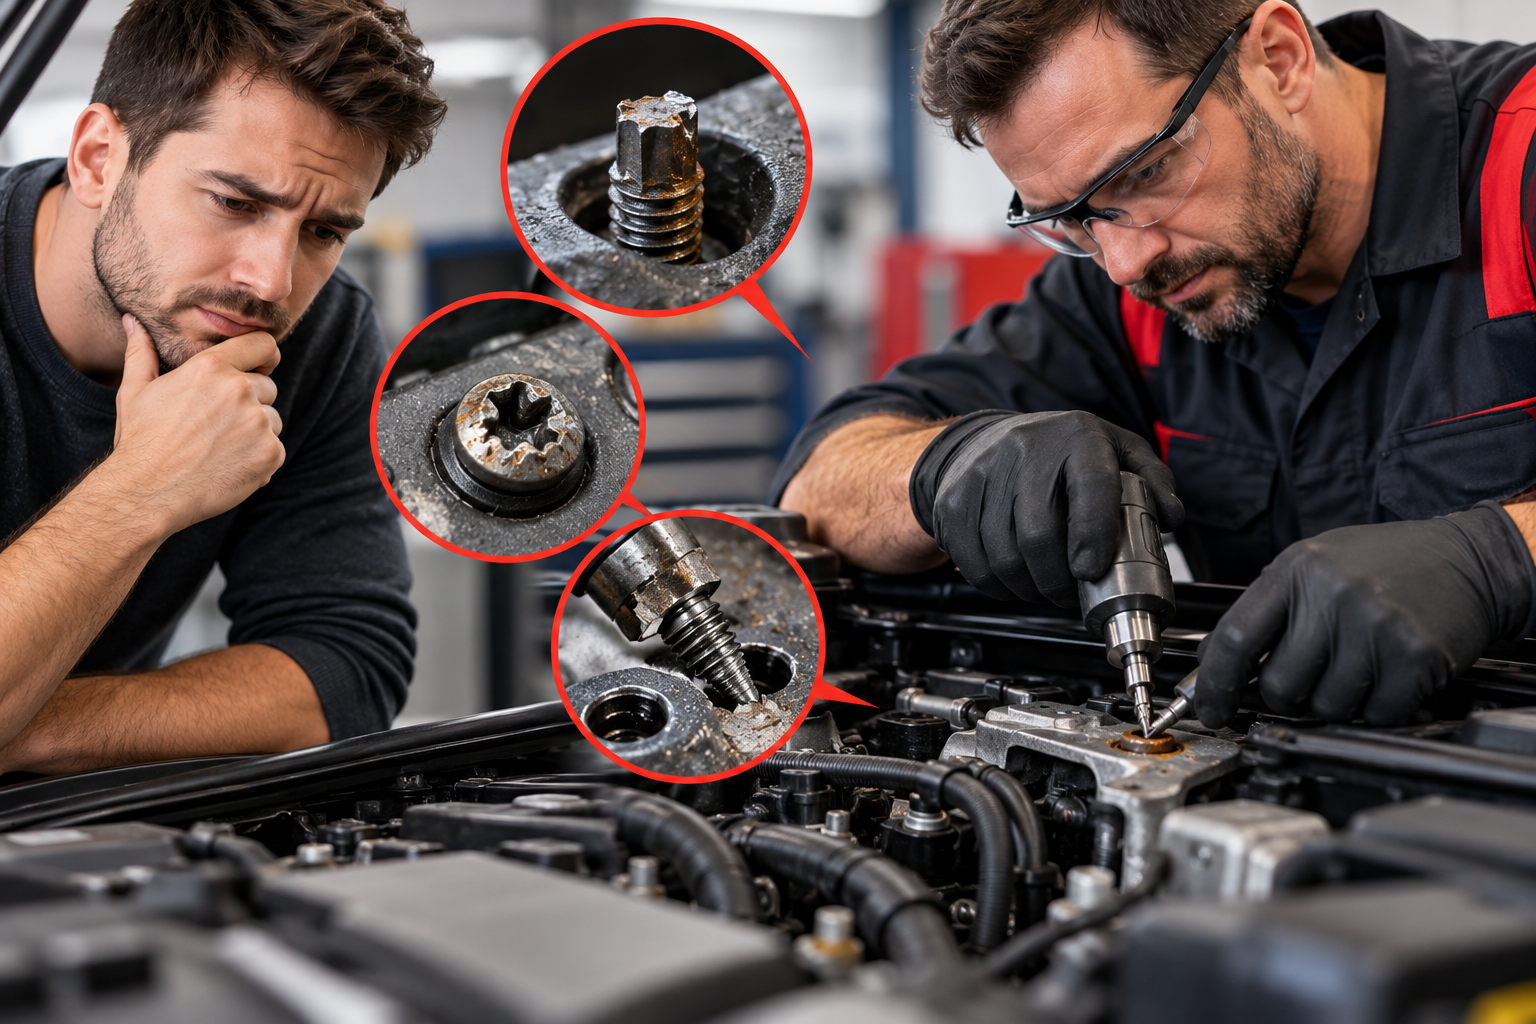
Consider professional help when:
- The screw has broken below the surface.
- You cannot determine what is behind the fastener.
- A screw extractor has snapped or may snap.
- The fastener is part of a safety-critical assembly.
- Access requires unfamiliar disassembly procedures.
- Drilling could damage expensive or irreplaceable components.
- The threads require a repair that must maintain a specified strength.
A qualified technician may use specialized extraction equipment or controlled disassembly to remove the fastener while preserving the surrounding assembly.
What to Do After Removing a Stripped Screw
Successfully removing the damaged screw is only part of the repair. Before installing a replacement, inspect the mounting point.
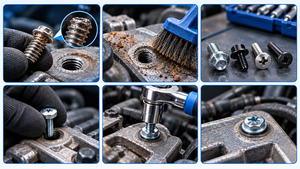
- Inspect the threads: Check for wear, deformation, or pulled inserts.
- Clean the area: Remove loose metal fragments, debris, and corrosion.
- Choose the correct replacement: Match thread pitch, diameter, length, head style, and material specification.
- Start the screw by hand: Prevent cross-threading by confirming smooth initial engagement.
- Tighten properly: Follow manufacturer torque specifications where applicable.
- Check the finished assembly: Confirm the component is secure and undamaged.
Do not automatically apply lubricant or anti-seize to every replacement screw. Some fasteners rely on specific friction characteristics to achieve the correct clamping force.
How to Prevent Stripping Screws in the Future
Always use a tool that matches the fastener’s drive style and size.
Keep the screwdriver straight to prevent slipping and rounding.
Use controlled torque and follow the correct specifications.
Hand-start screws to help prevent cross-threading.
Avoid reinstalling screws with heavily worn heads or threads.
Frequently Asked Questions
Answers to common questions about removing damaged screws.
How do I remove a stripped screw without special tools?
Try a correctly fitting manual screwdriver first. If the screw is only slightly damaged, a wide rubber band may improve grip. If the screw head sticks out, locking pliers may also work. Stop when a method causes additional damage.
What is the easiest way to get a stripped screw out?
For mild damage, using a fresh screwdriver bit that fits correctly is often the simplest approach. If the head is badly rounded but protrudes above the surface, suitable extraction pliers may be more effective.
How do you remove a burred screw?
A burred screw generally has damaged or deformed metal around the head. Clean debris, inspect the remaining recess, and try a correctly fitting screwdriver. If the head cannot engage a driver, consider pliers or an appropriate extractor.
Can a rubber band remove a stripped screw?
Sometimes. Rubber can help increase friction between a screwdriver and a mildly rounded recess. It generally will not work on a completely destroyed head or a heavily seized screw.
How do you take out a screw with a completely damaged head?
If enough of the head is exposed, screw-extraction pliers may be suitable. Otherwise, a compatible extractor may provide a new gripping point. Cutting or drilling should be considered only when access and surrounding conditions make those methods safe.
How do I remove a stripped screw from plastic?
Use a correctly sized hand screwdriver and avoid excessive force. Plastic mounting points may crack under impact or drilling. If the screw spins without backing out, the internal threads or plastic insert may be damaged.
Why does my screw turn but not come out?
The screw or mounting-hole threads may be stripped, or a threaded insert may be rotating. Inspect the mounting point. Gentle outward tension may help in some accessible assemblies, but excessive prying can damage the material.
How can I remove seized screws without breaking them?
Clean loose corrosion, use a suitable penetrating oil according to its instructions, and attempt controlled removal with the correct tool. If the screw twists, the bracket bends, or resistance remains excessive, stop and reassess.
Should I drill out a stripped screw?
Drilling should generally be a last resort. It requires safe access, suitable equipment, and an appropriate procedure. Avoid blind drilling, particularly near wiring, fuel systems, sensitive components, or mounting threads that cannot easily be repaired.
Final Thoughts
Learning how to remove a stripped screw is less about applying maximum force and more about choosing the correct method for the damage.
A properly fitting screwdriver or simple rubber band may be enough for minor problems. Exposed screw heads may respond to extraction pliers, while badly damaged or seized fasteners can require specialized tools.
The most important rule: Start with the least destructive approach, stop when damage increases, and protect the surrounding components. A successful repair removes the fastener without creating a larger problem for your vehicle.