
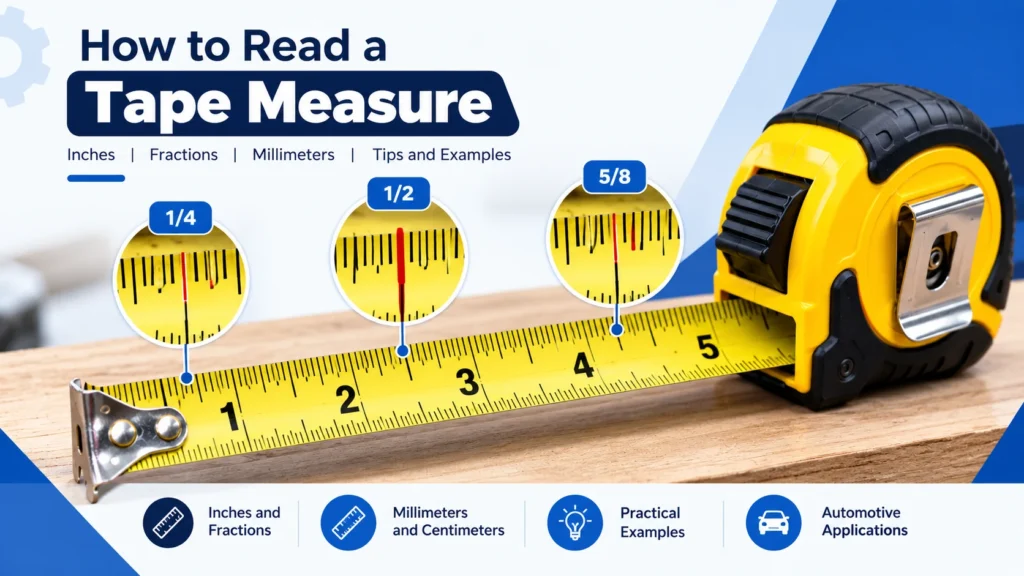
Ever looked at a tape measure and wondered what all those tiny lines mean? You can probably recognize the numbers marking whole inches, but figuring out measurements like 3/16, 5/8, or 11/16 can feel confusing when you’re just starting.
Whether you’re measuring a replacement car bracket, installing garage shelves, or planning a home improvement project, knowing how to read a tape measure helps you avoid inaccurate cuts, poorly fitting parts, and unnecessary rework.
The good news is that tape measure marks follow a predictable pattern. Once you understand whole inches, fractions, and different tick-mark lengths, reading measurements becomes much easier.
This guide explains tape measure markings in simple terms, demonstrates how to read inches and millimeters, provides an easy fraction chart, and shows how to take accurate measurements for everyday DIY and automotive projects.
How to Read a Tape Measure
To read a tape measure in inches, locate the last complete inch mark before the endpoint, then identify the fractional mark where the object ends.
- Place the tape’s zero point at the start of the object.
- Find the last numbered whole-inch mark.
- Count the smaller marks beyond that number.
- Identify the fraction represented by the endpoint.
- Combine the whole inches and the fraction.
Example: If the endpoint falls 10 sixteenth-inch divisions past the 5-inch mark, the measurement is 5 10/16 inches, simplified to 5 5/8 inches.
What Are the Parts of a Tape Measure?
Before learning how to read tape measure measurements, it helps to understand the tool itself. A standard retractable tape measure has several components that affect how measurements are taken.
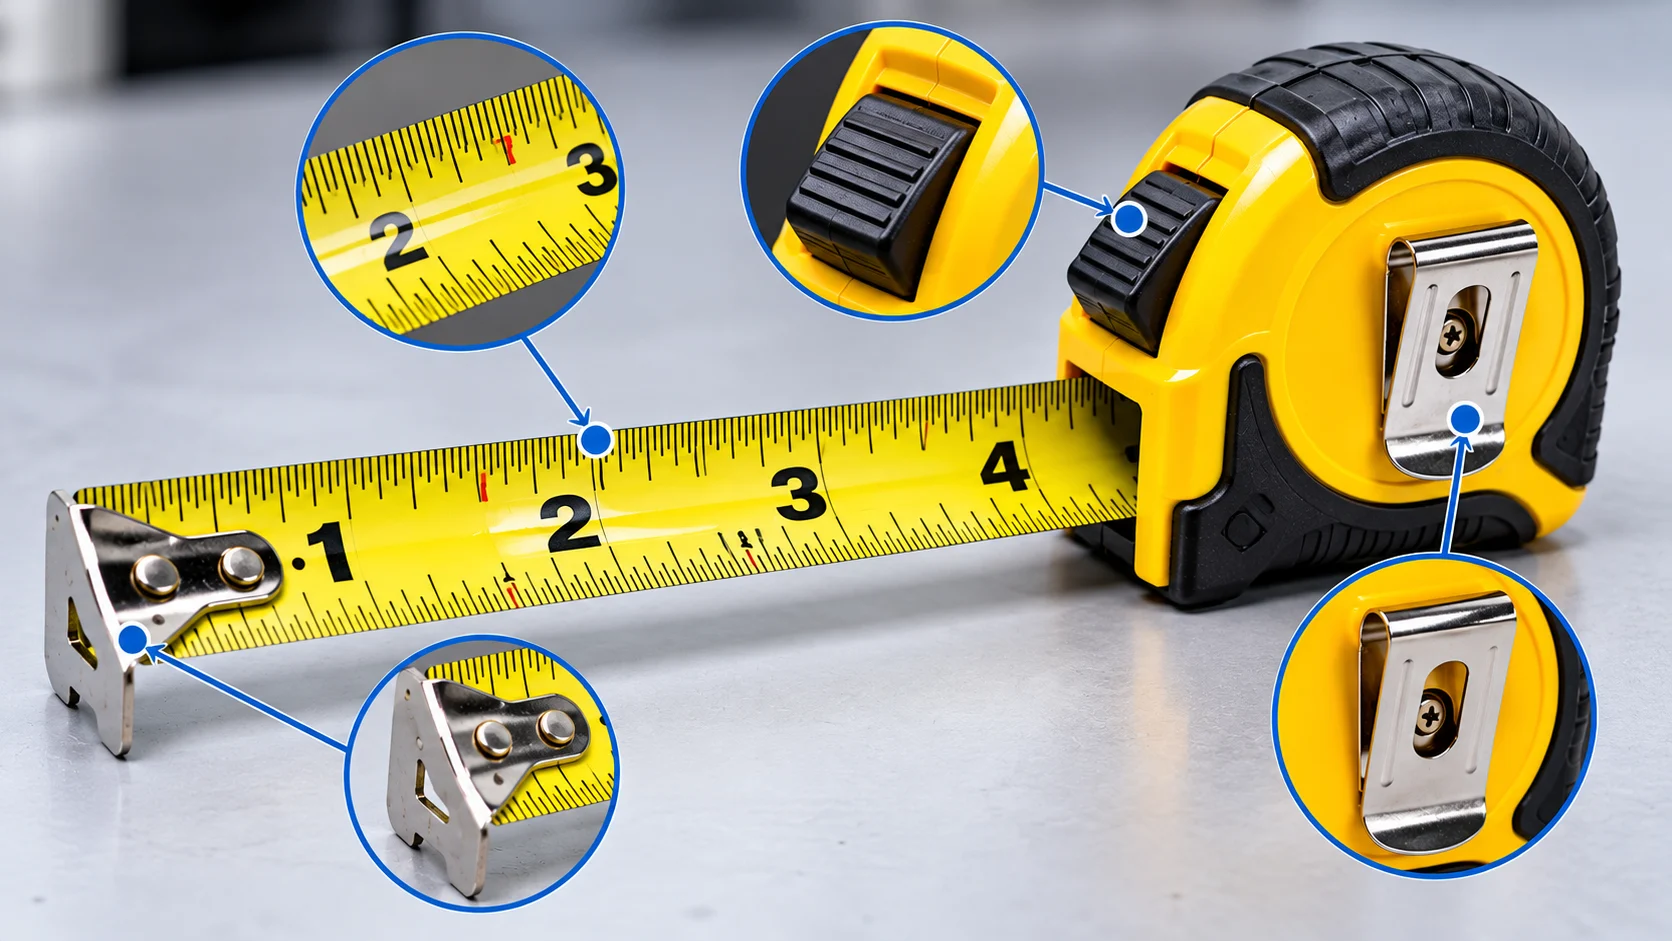
Metal Hook
The small metal tab at the end of the tape holds against an object’s edge. On many tapes, it moves slightly to compensate for its thickness during inside and outside measurements.
Measuring Blade
The extended metal strip contains the inch or metric measurement scale. Keeping it straight helps improve accuracy.
Locking Mechanism
The lock keeps the blade extended while you check or record a measurement.
Numbers and Tick Marks
The numbers identify major units, while the smaller lines between them indicate fractional inches or millimeters.
Helpful tip: Some US tape measures show inches and metric measurements on separate edges. Always confirm which scale you are reading.
What Do the Marks on a Tape Measure Mean?
Tape measure marks are lines that divide larger units into smaller measurements. On a typical US measuring tape, a single inch is divided into fractions.
Many common tape measures show increments of 1/16 inch. This means there are 16 equal spaces between one whole-inch mark and the next.
Understanding One Full Inch
How Line Lengths Work
| Mark | What It Represents | How to Identify It |
|---|---|---|
| 1 inch | One complete inch | Major numbered division |
| 1/2 inch | Half an inch | Prominent middle line |
| 1/4 inch | One quarter | Quarter-point division |
| 1/8 inch | One eighth | Smaller intermediate division |
| 1/16 inch | One sixteenth | Usually the shortest division |
For example, the 1/2-inch mark sits exactly halfway between two whole-inch numbers. The 1/4-inch mark sits halfway between the starting inch and the 1/2-inch position.
Different tape measures may use different marking styles or precision levels, so check the blade rather than assuming every tape is identical.
How to Read a Tape Measure in Inches: Step by Step
The easiest way to learn is by working through a real measurement. Imagine you are measuring a small automotive mounting bracket, and its endpoint falls at 4 3/8 inches.
Place the hook against the starting edge and extend the blade along the object.
Find the largest numbered mark just before the endpoint. In this example, it is 4 inches.
Count six 1/16-inch divisions after the 4-inch mark.
Six sixteenths equals 6/16, which simplifies to 3/8.
The object measures 4 inches plus 3/8 inch, written as 4 3/8 inches.
Visual Example: 4 3/8 Inches
Remember: The whole-inch number tells you where the measurement starts. The smaller marks tell you how much farther the endpoint extends.
Complete Tape Measure Fraction Chart
This tape measure fraction chart helps you identify every common sixteenth-inch increment between two whole-inch marks.
Each position represents an additional 1/16 inch. Some fractions simplify to halves, quarters, or eighths.
| Mark Number | Fraction | Decimal Inches |
|---|---|---|
| 1 | 1/16 | 0.0625 |
| 2 | 1/8 | 0.125 |
| 3 | 3/16 | 0.1875 |
| 4 | 1/4 | 0.25 |
| 5 | 5/16 | 0.3125 |
| 6 | 3/8 | 0.375 |
| 7 | 7/16 | 0.4375 |
| 8 | 1/2 | 0.5 |
| 9 | 9/16 | 0.5625 |
| 10 | 5/8 | 0.625 |
| 11 | 11/16 | 0.6875 |
| 12 | 3/4 | 0.75 |
| 13 | 13/16 | 0.8125 |
| 14 | 7/8 | 0.875 |
| 15 | 15/16 | 0.9375 |
| 16 | 1 inch | 1.0 |
How to Use the Fraction Chart
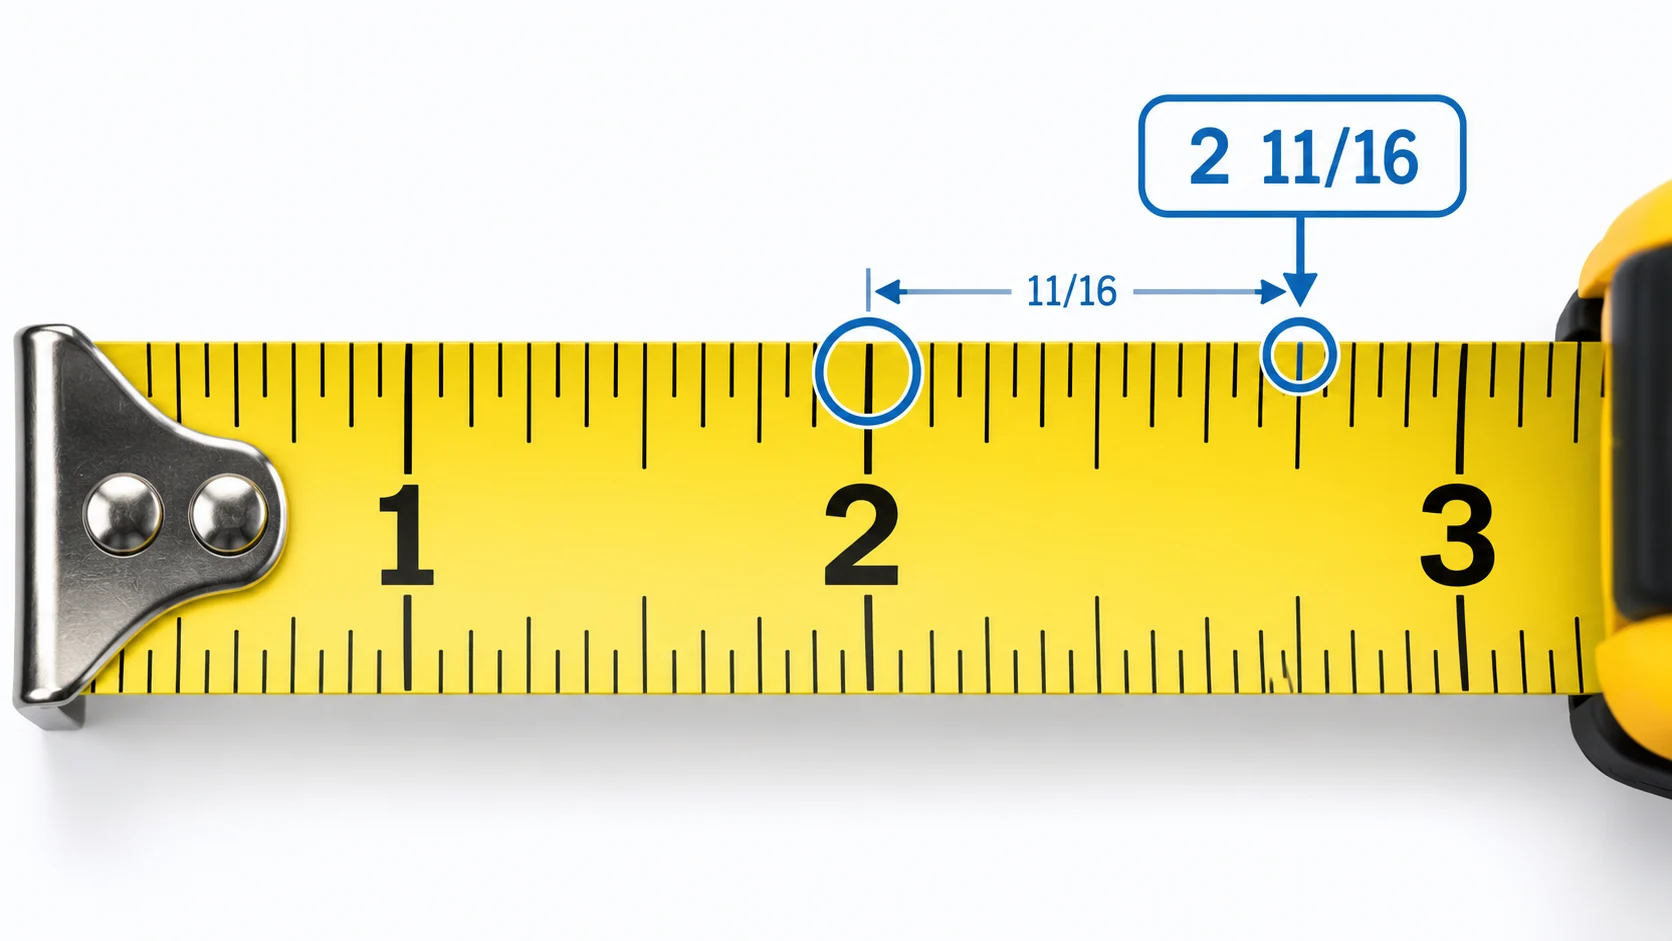
Suppose you count 11 small divisions after a whole-inch mark. On a tape marked in sixteenths, the endpoint is 11/16 inch beyond that number.
If those 11 divisions occur after the 2-inch mark, the complete measurement is 2 11/16 inches.
You do not have to memorize the entire chart immediately. Begin with 1/2, 1/4, and 1/8, then gradually become familiar with the remaining sixteenth-inch marks.
Where Are Specific Fractions on a Tape Measure?
Many people search for a particular fraction because they can see a line on their measuring tape but do not know what it means.
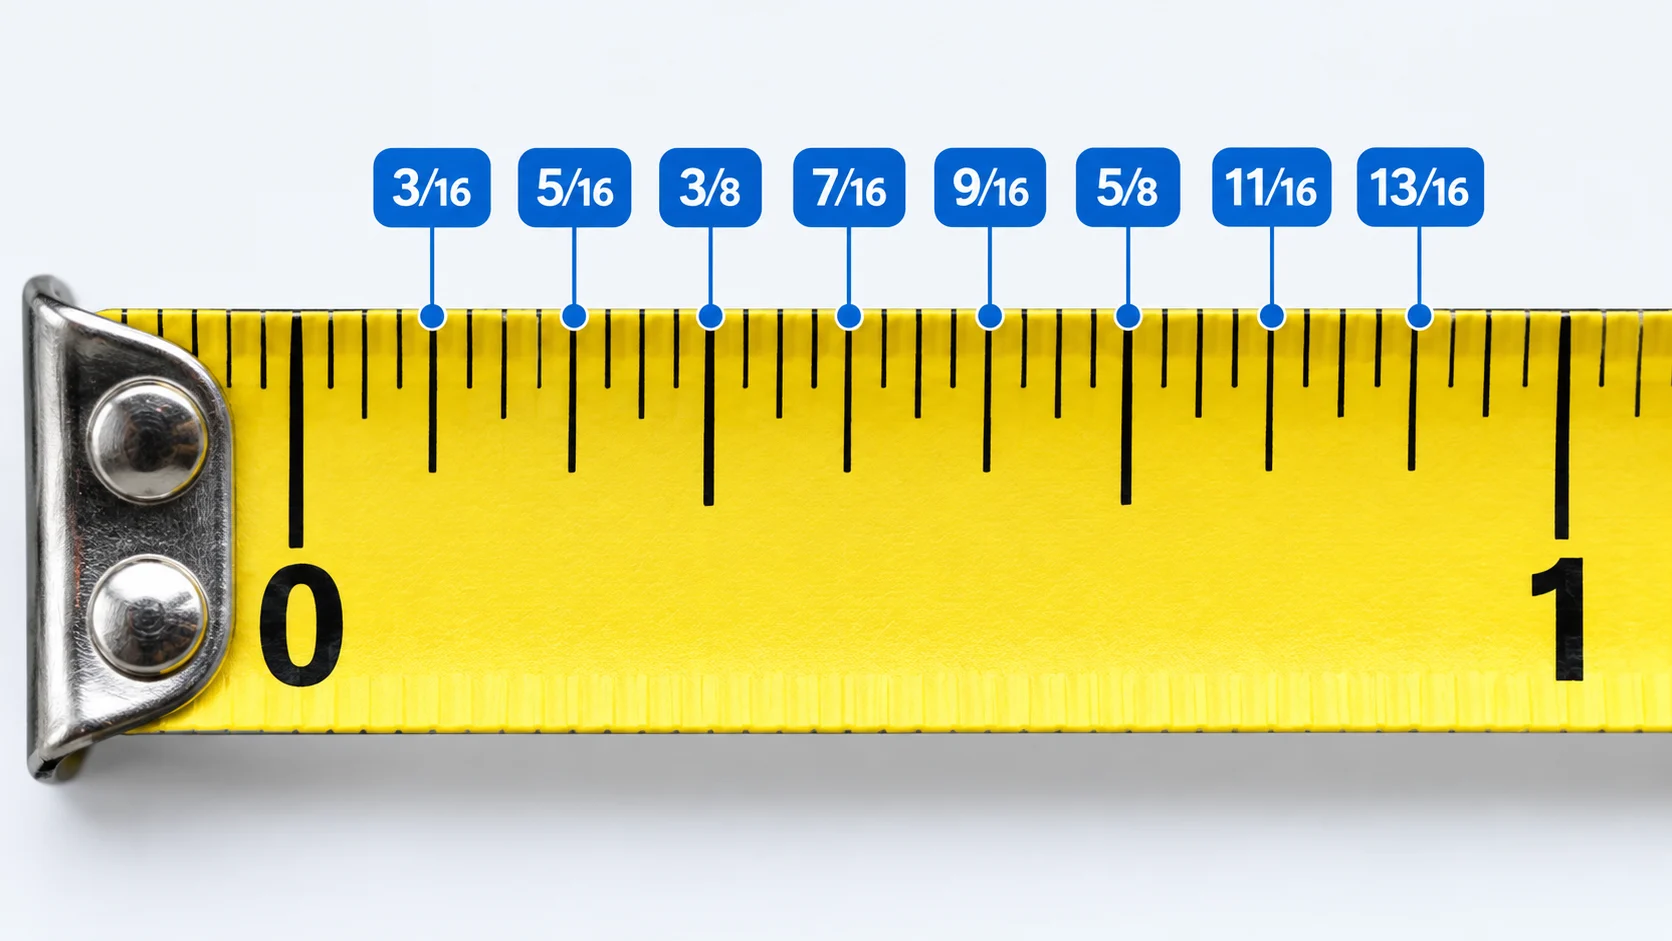
The following reference explains exactly where the most frequently searched fractions appear on a standard tape marked in 1/16-inch intervals.
What Does 5/16 Look Like on a Tape Measure?
The 5/16-inch mark is the fifth 1/16-inch division after a whole-inch number. It falls between 1/4 inch and 3/8 inch.
Because 5/16 cannot be simplified further, the fraction stays the same when you record it.
Where Is 3/8 on a Tape Measure?
The 3/8-inch mark is the sixth sixteenth-inch division. It lies halfway between 1/4 inch and 1/2 inch.
Another way to find it is to count three 1/8-inch intervals from the beginning of the inch.
Where Is 5/8 on a Tape Measure?
The 5/8-inch mark is the tenth sixteenth-inch division. It sits halfway between 1/2 inch and 3/4 inch.
This is one of the most common fractional measurements used in DIY projects.
How Do You Find 11/16 on a Tape Measure?
The 11/16-inch mark is the eleventh sixteenth-inch division. It falls between 5/8 inch and 3/4 inch.
Starting at the 1/2-inch mark, count three additional 1/16-inch divisions to reach 11/16.
Where Is 13/16 on a Measuring Tape?
The 13/16-inch mark is the thirteenth sixteenth-inch division. It comes immediately after 3/4 inch on a tape marked in sixteenths.
It is larger than 3/4 inch but smaller than 7/8 inch.
Other Useful Fraction Locations
| Fraction | Position | Helpful Reference |
|---|---|---|
| 3/16 | 3rd division | Just before 1/4 |
| 7/16 | 7th division | Just before 1/2 |
| 9/16 | 9th division | Just after 1/2 |
| 11/16 | 11th division | Between 5/8 and 3/4 |
| 13/16 | 13th division | Just after 3/4 |
How to Read a Tape Measure in Millimeters and Centimeters
Not every measuring tape uses fractional inches. Metric tape measures use millimeters, centimeters, and meters.
The metric system is based on groups of ten, which makes its measurement increments straightforward.
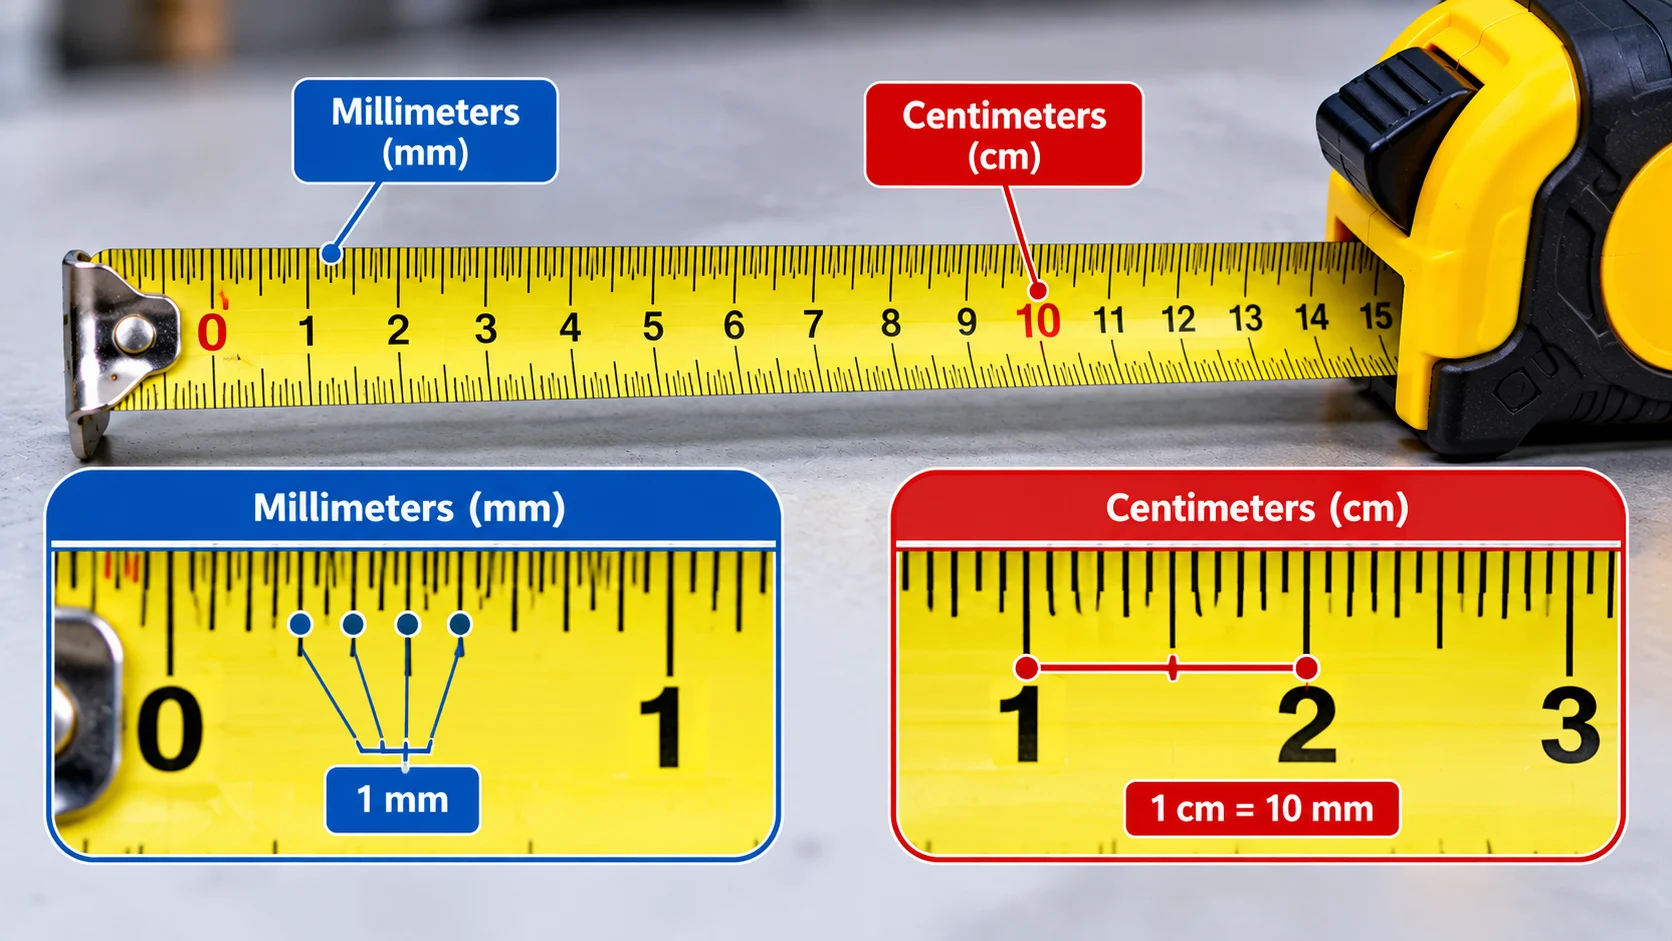
Basic Metric Relationships
- 10 millimeters (mm) = 1 centimeter (cm)
- 100 centimeters = 1 meter (m)
- 1,000 millimeters = 1 meter
- 25.4 millimeters = 1 inch
Understanding Metric Tape Marks
On a typical metric measuring tape, the numbered centimeter marks appear at regular intervals. The smaller divisions between them represent millimeters.
Example: How to Measure 22 mm
- Start at the zero point on the metric scale.
- Find the 2 cm mark, which equals 20 mm.
- Move two additional millimeter divisions.
- Read the final result as 22 mm, or 2.2 cm.
If you need to convert this measurement to inches, divide the millimeter value by 25.4.
Conversion example: 2.2 cm equals 22 mm, which is approximately 0.866 inches.
How to Measure Millimeters Accurately
Make sure you’re reading the metric side of the tape. Identify the nearest centimeter number, then count the individual millimeter divisions after it.
For example, 4 centimeters and 7 millimeters equals 47 mm.
How to Read Mixed Measurements Like 1 1/8 and 5 5/8 Inches
A mixed measurement combines a whole number and a fraction. These measurements appear frequently when working with tape measures.
For example, 5 5/8 inches means five full inches plus another five-eighths of an inch.
1 1/8 Inches
Start at the 1-inch mark and move forward by two sixteenth-inch divisions.
1 + 2/16 = 1 1/8 inches
5 5/8 Inches
Start at the 5-inch mark and move forward by ten sixteenth-inch divisions.
5 + 10/16 = 5 5/8 inches
Another Example: 2 11/16 Inches
Find the 2-inch mark. Count 11 sixteenth-inch divisions after it. The endpoint is 2 11/16 inches.
When recording a measurement, write both the whole-inch number and fraction to prevent confusion.
Practical tip: When giving measurements to another person, say “five and five-eighths inches” rather than simply “five-eight,” which could be misunderstood.
Tape Measure vs. Ruler: Are the Markings the Same?
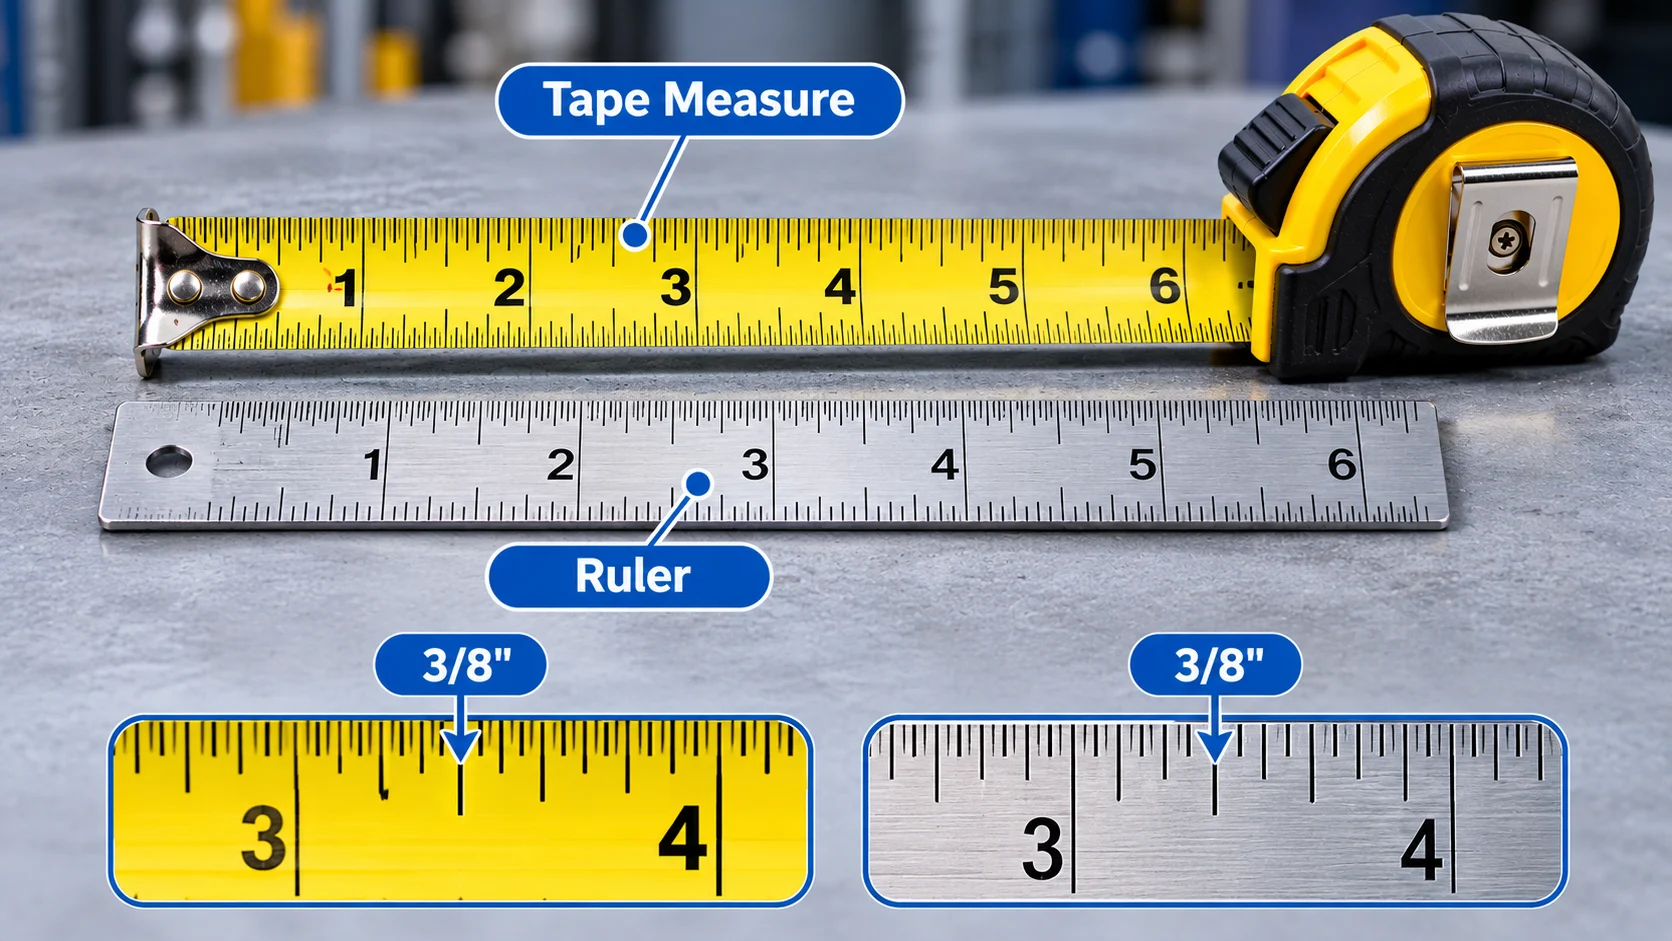
An imperial ruler and an imperial measuring tape use the same underlying fractional-inch system, although their size, construction, and level of precision can differ.
That means 3/8 inch on a ruler represents exactly the same length as 3/8 inch on a tape measure.
| Feature | Tape Measure | Ruler |
|---|---|---|
| Design | Flexible or retractable blade | Usually rigid and straight |
| Best for | Longer and awkward measurements | Short, accessible measurements |
| Fraction marks | Depends on scale and model | Depends on scale and model |
| Common applications | Construction, garages, furniture | Drawing, schoolwork, small parts |
Where Is 3/8 on a Ruler?
Find the 1/4-inch mark and move another 1/8 inch toward 1/2 inch.
On a ruler marked in sixteenths, 3/8 inch is the sixth small division after zero.
How Do You Find 5 5/8 on a Ruler?
On a ruler long enough to show the measurement, locate the 5-inch mark and move another 5/8 inch.
This is the tenth sixteenth-inch division after 5 inches.
How to Take Accurate Measurements with a Tape Measure
Understanding tape measure numbers is only part of the process. Your technique also affects the final reading.
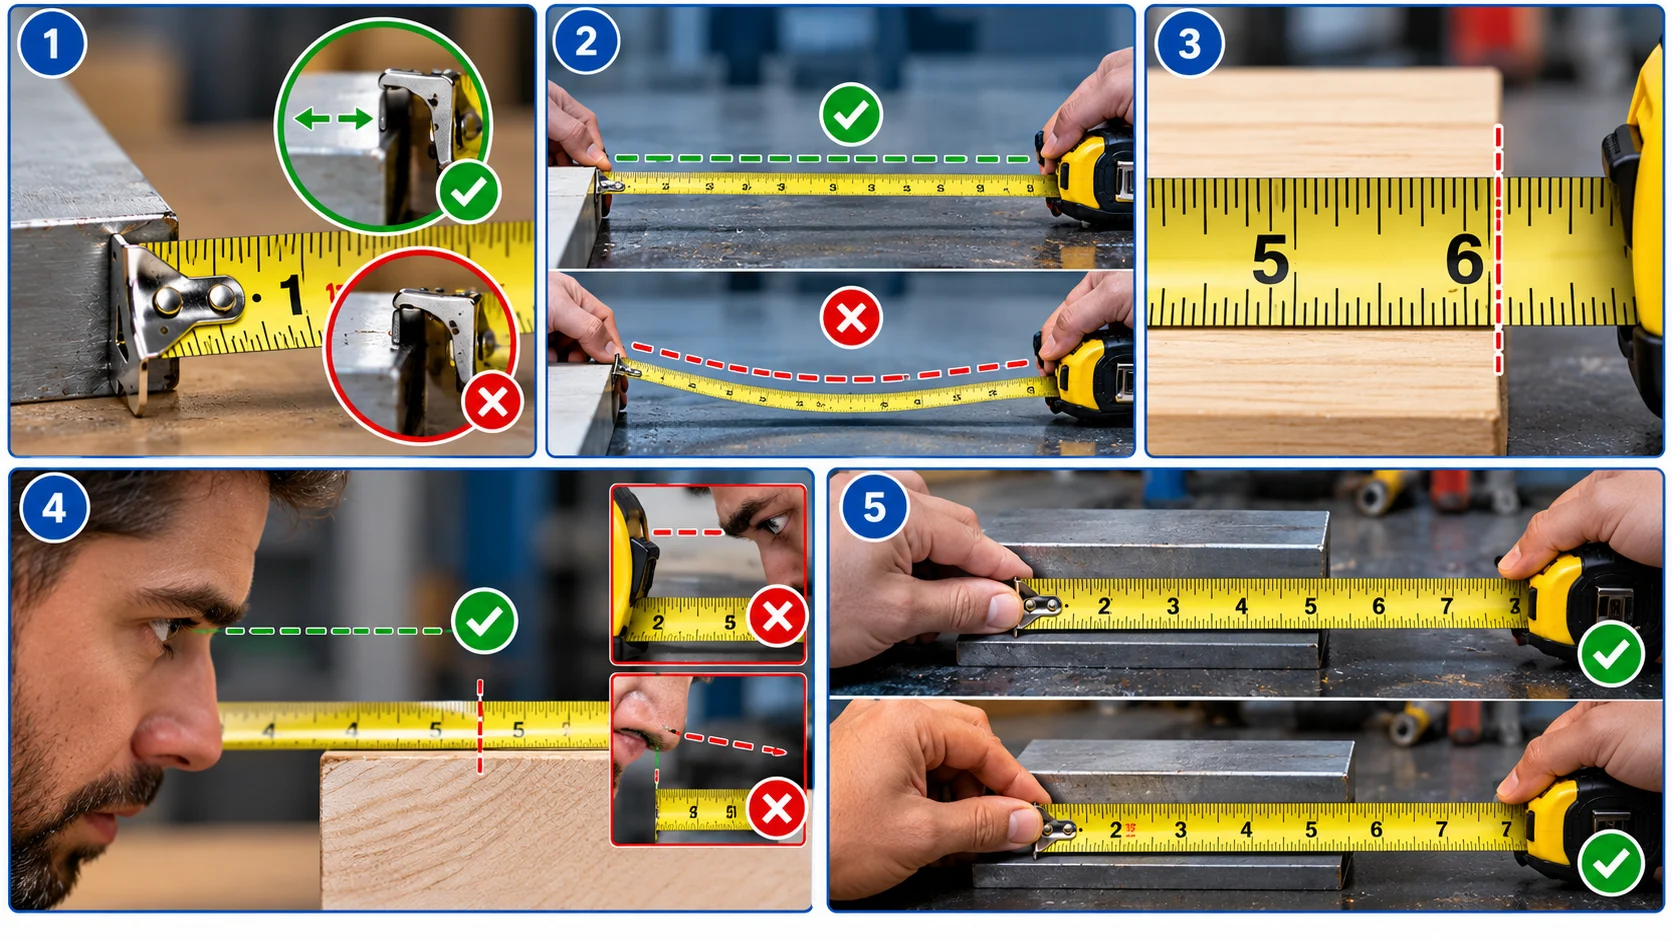
1. Start from the Correct Reference Point
Make sure the tape’s starting reference is properly aligned with the object. If you’re using the end hook, inspect it for damage before measuring.
2. Keep the Blade Straight
A twisted, sagging, or diagonal tape can produce an inaccurate measurement. Keep the blade aligned with the actual dimension you’re measuring.
3. Read at the Endpoint
Identify the exact mark at the object’s end. Avoid estimating between marks unless the tool and required precision justify that approach.
4. Avoid Reading from an Angle
Read the scale from a position that minimizes parallax, the apparent shift in a mark caused by viewing it from an angle.
5. Double-Check Important Measurements
Before cutting material, drilling mounting holes, or ordering replacement parts, confirm the measurement a second time.
How to Use a Tape Measure for Automotive Projects
A tape measure is a useful tool for many car maintenance and garage projects, particularly when you need to check the size of an accessible part or available installation space.
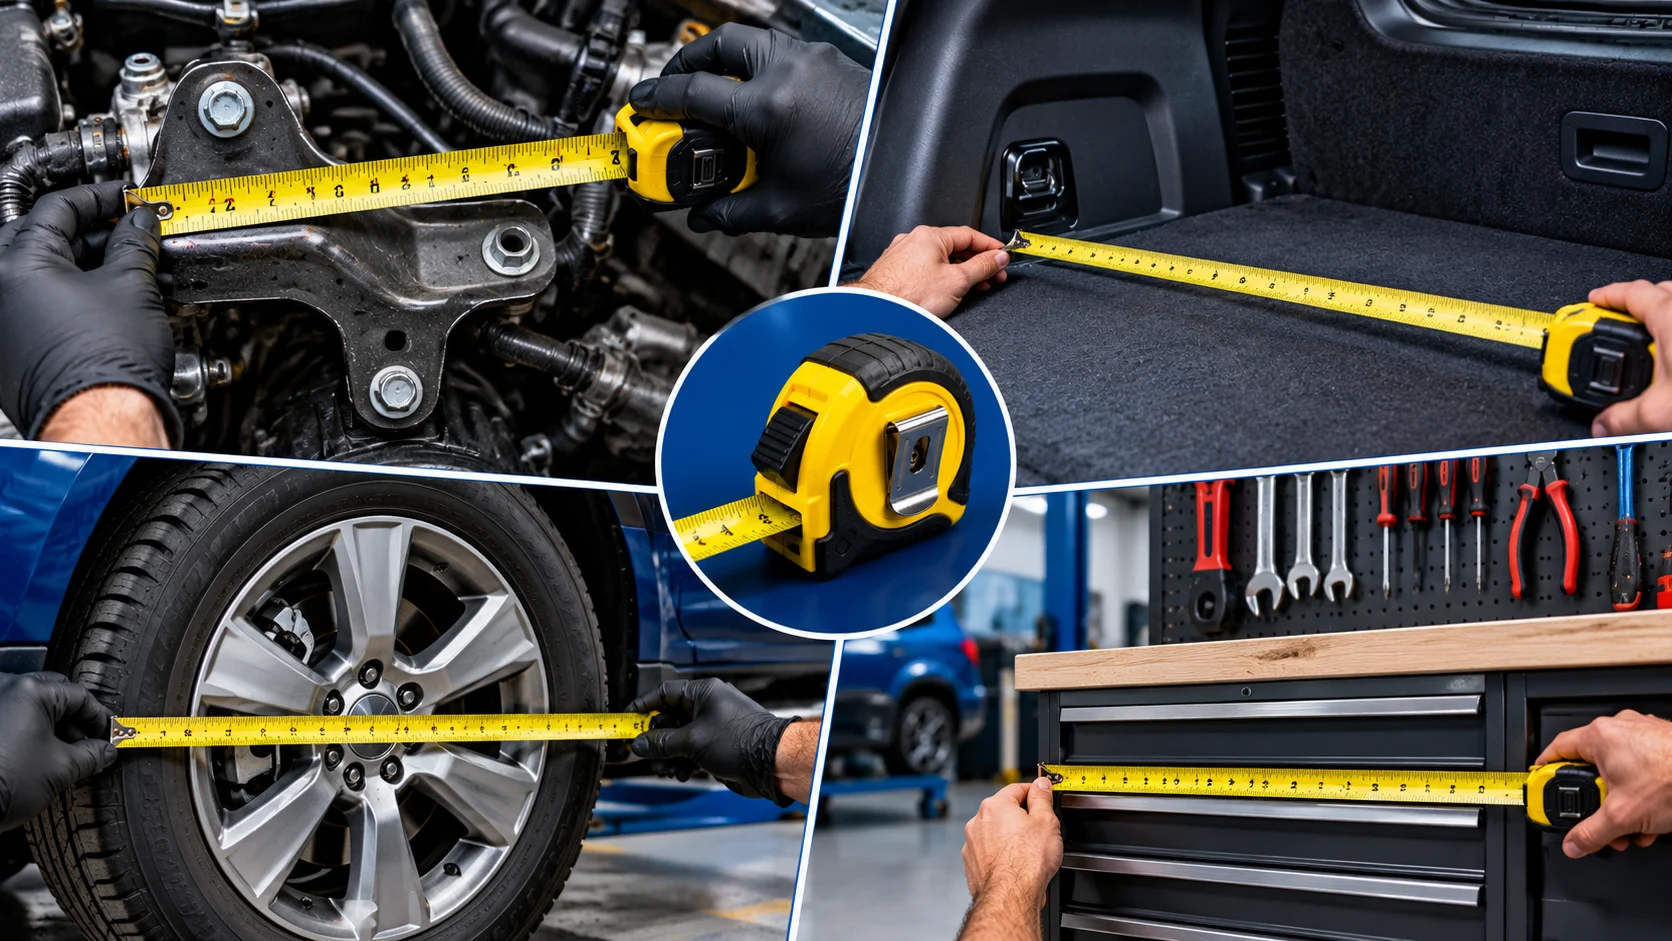
However, not all automotive measurements can be made accurately with an ordinary measuring tape.
Measuring a Metal Bracket
When replacing a removable metal bracket, you may need to check its overall length or width. A tape measure can help identify general dimensions before comparing them with the replacement component.
Checking Interior Trim
You can use a tape to measure accessible trim panels or approximate the available space for a properly approved accessory installation.
Planning Garage Installations
Tape measures are useful for organizing tool racks, storage cabinets, workbenches, and shelving around your vehicle.
When Should You Use a Different Measuring Tool?
If a component requires precise dimensional tolerance, a tape measure may not provide sufficient accuracy.
For example, measuring bolt thread diameters, small mechanical clearances, shaft dimensions, or precision mounting hardware may require calipers or other tools specified by the manufacturer.
Important: For safety-critical vehicle components, use the manufacturer’s prescribed measurement methods and specifications rather than approximate tape readings.
Common Tape Measure Reading Mistakes
Even after learning the fractional marks, beginners can make simple mistakes that affect the accuracy of their measurements.
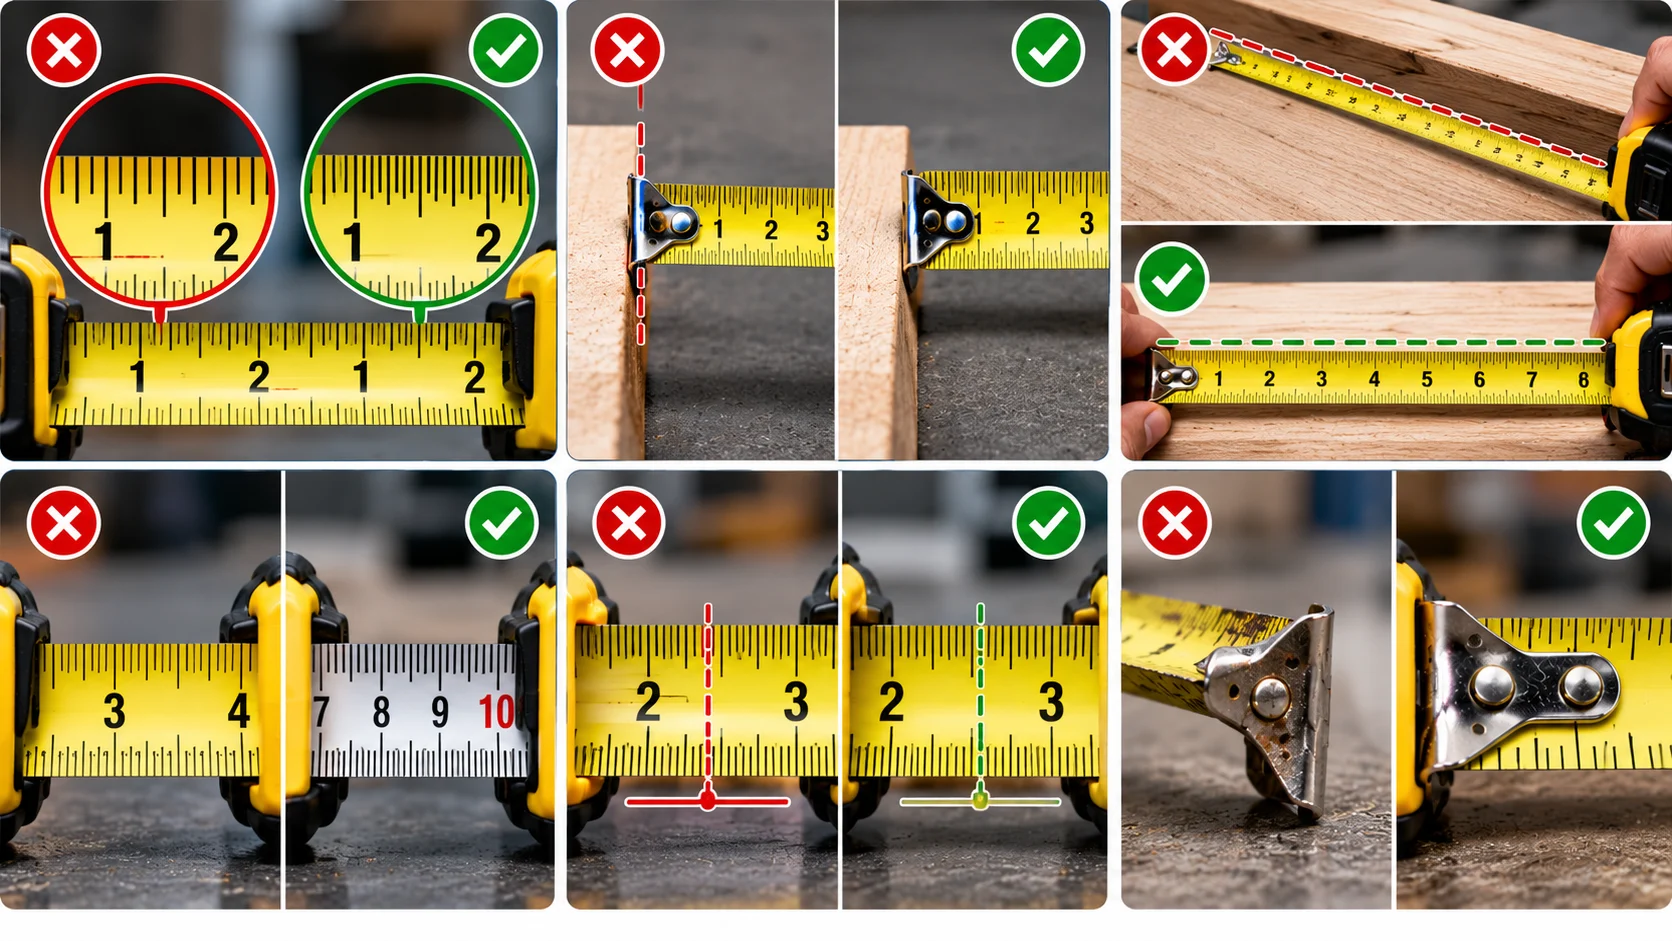
| Common Mistake | Why It Causes Problems | Better Approach |
|---|---|---|
| Counting the wrong increments | Fractions become inaccurate. | Confirm whether the tape is marked in 1/8 or 1/16 inch. |
| Starting at the wrong point | Every measurement includes an offset. | Use the correct zero reference. |
| Holding the tape diagonally | The reading may be longer than the intended distance. | Keep the tape aligned with the measurement direction. |
| Confusing metric and imperial units | Measurements are recorded incorrectly. | Identify the scale before measuring. |
| Rounding measurements too soon | Small errors may accumulate. | Record the original measurement first. |
| Using damaged tape equipment | A bent hook or worn blade can affect accuracy. | Inspect the tape before use. |
One useful habit is to say the measurement out loud before writing it down. For example, “four and three-eighths inches” is clearer than simply saying “four-three-eight.”
Practice: Can You Read These Tape Measure Measurements?
Before finishing, test your understanding with these simple questions. Try solving each problem first, then open the answer.
Practice Question 1
The endpoint falls four sixteenth-inch divisions after zero. What is the measurement?
Show Answer
Four sixteenths simplify to 1/4. The measurement is 1/4 inch.
Practice Question 2
The endpoint falls seven sixteenth-inch divisions after the 2-inch mark. What is the measurement?
Show Answer
The measurement is 2 7/16 inches.
Practice Question 3
You find the 3-inch mark and count eleven sixteenth-inch divisions farther. What should you record?
Show Answer
The correct reading is 3 11/16 inches.
Practice Question 4
On a metric tape, an endpoint sits 6 small millimeter divisions beyond the 4 cm mark. What is the measurement?
Show Answer
The measurement is 46 mm, which also equals 4.6 cm.
If you can solve these examples, you already understand the core principles behind reading common measuring tape increments.
Frequently Asked Questions
Quick answers about tape measure markings, fractions, and metric measurements.
How do you read a tape measure for beginners?
Find the last whole-inch mark before the endpoint. Then identify how many fractional divisions extend beyond that number. Combine the whole inches and the fraction to record the measurement.
What do the small lines on a tape measure mean?
The small lines represent subdivisions of the main measurement unit. On many imperial tapes, these divisions show halves, quarters, eighths, and sixteenths of an inch.
Where is 5/8 on a tape measure?
On a 1/16-inch scale, 5/8 is the tenth division after a whole-inch mark. It is halfway between 1/2 inch and 3/4 inch.
Where is 5/16 on a tape measure?
The 5/16-inch mark is the fifth sixteenth-inch division after a whole-inch mark. It falls between 1/4 inch and 3/8 inch.
What does 3/16 look like on a tape measure?
The 3/16-inch mark is the third sixteenth-inch division. It appears immediately before the 1/4-inch mark on a tape divided into sixteenths.
Where is 7/16 on a measuring tape?
The 7/16-inch mark is the seventh sixteenth-inch division after a whole inch. It falls immediately before 1/2 inch.
How do you find 11/16 on a tape measure?
Count eleven sixteenth-inch intervals after a whole-inch mark. The position is between 5/8 and 3/4 inch.
Where is 13/16 on a tape measure?
The 13/16-inch mark is the thirteenth sixteenth-inch interval. It is immediately after 3/4 inch on a 1/16-inch scale.
How many millimeters are in one inch?
One inch equals exactly 25.4 millimeters. This conversion is useful when comparing imperial and metric dimensions.
How do you read millimeters on a tape measure?
Locate the metric scale. Each small millimeter division represents 1 mm, while the larger centimeter intervals represent 10 mm each. Count the divisions from the nearest centimeter mark.
How do you measure 1 1/8 inches?
Locate the 1-inch mark, then count two sixteenth-inch intervals past it. Two sixteenths simplify to one eighth.
What is the difference between tape measure marks and ruler marks?
Both use the same units and fractional principles when marked in inches. However, the physical designs and smallest visible increments can differ between tools.
Final Thoughts
Learning how to read a tape measure becomes easier once you recognize the relationship between whole-inch numbers and the smaller fractional marks.
Start with halves, quarters, and eighths. Then use the fraction chart to identify sixteenth-inch increments such as 3/16, 5/16, 7/16, 11/16, and 13/16.
For metric measurements, remember that one centimeter contains ten millimeters. Always verify which measurement scale you’re using before recording a result.
The key takeaway: Identify the scale, read the whole number, count the smaller divisions, and double-check your final measurement. With practice, you’ll be able to read a measuring tape confidently for both automotive work and everyday DIY projects.